Sesame and Soy Baby Bok Choy

bok_choy_kylie

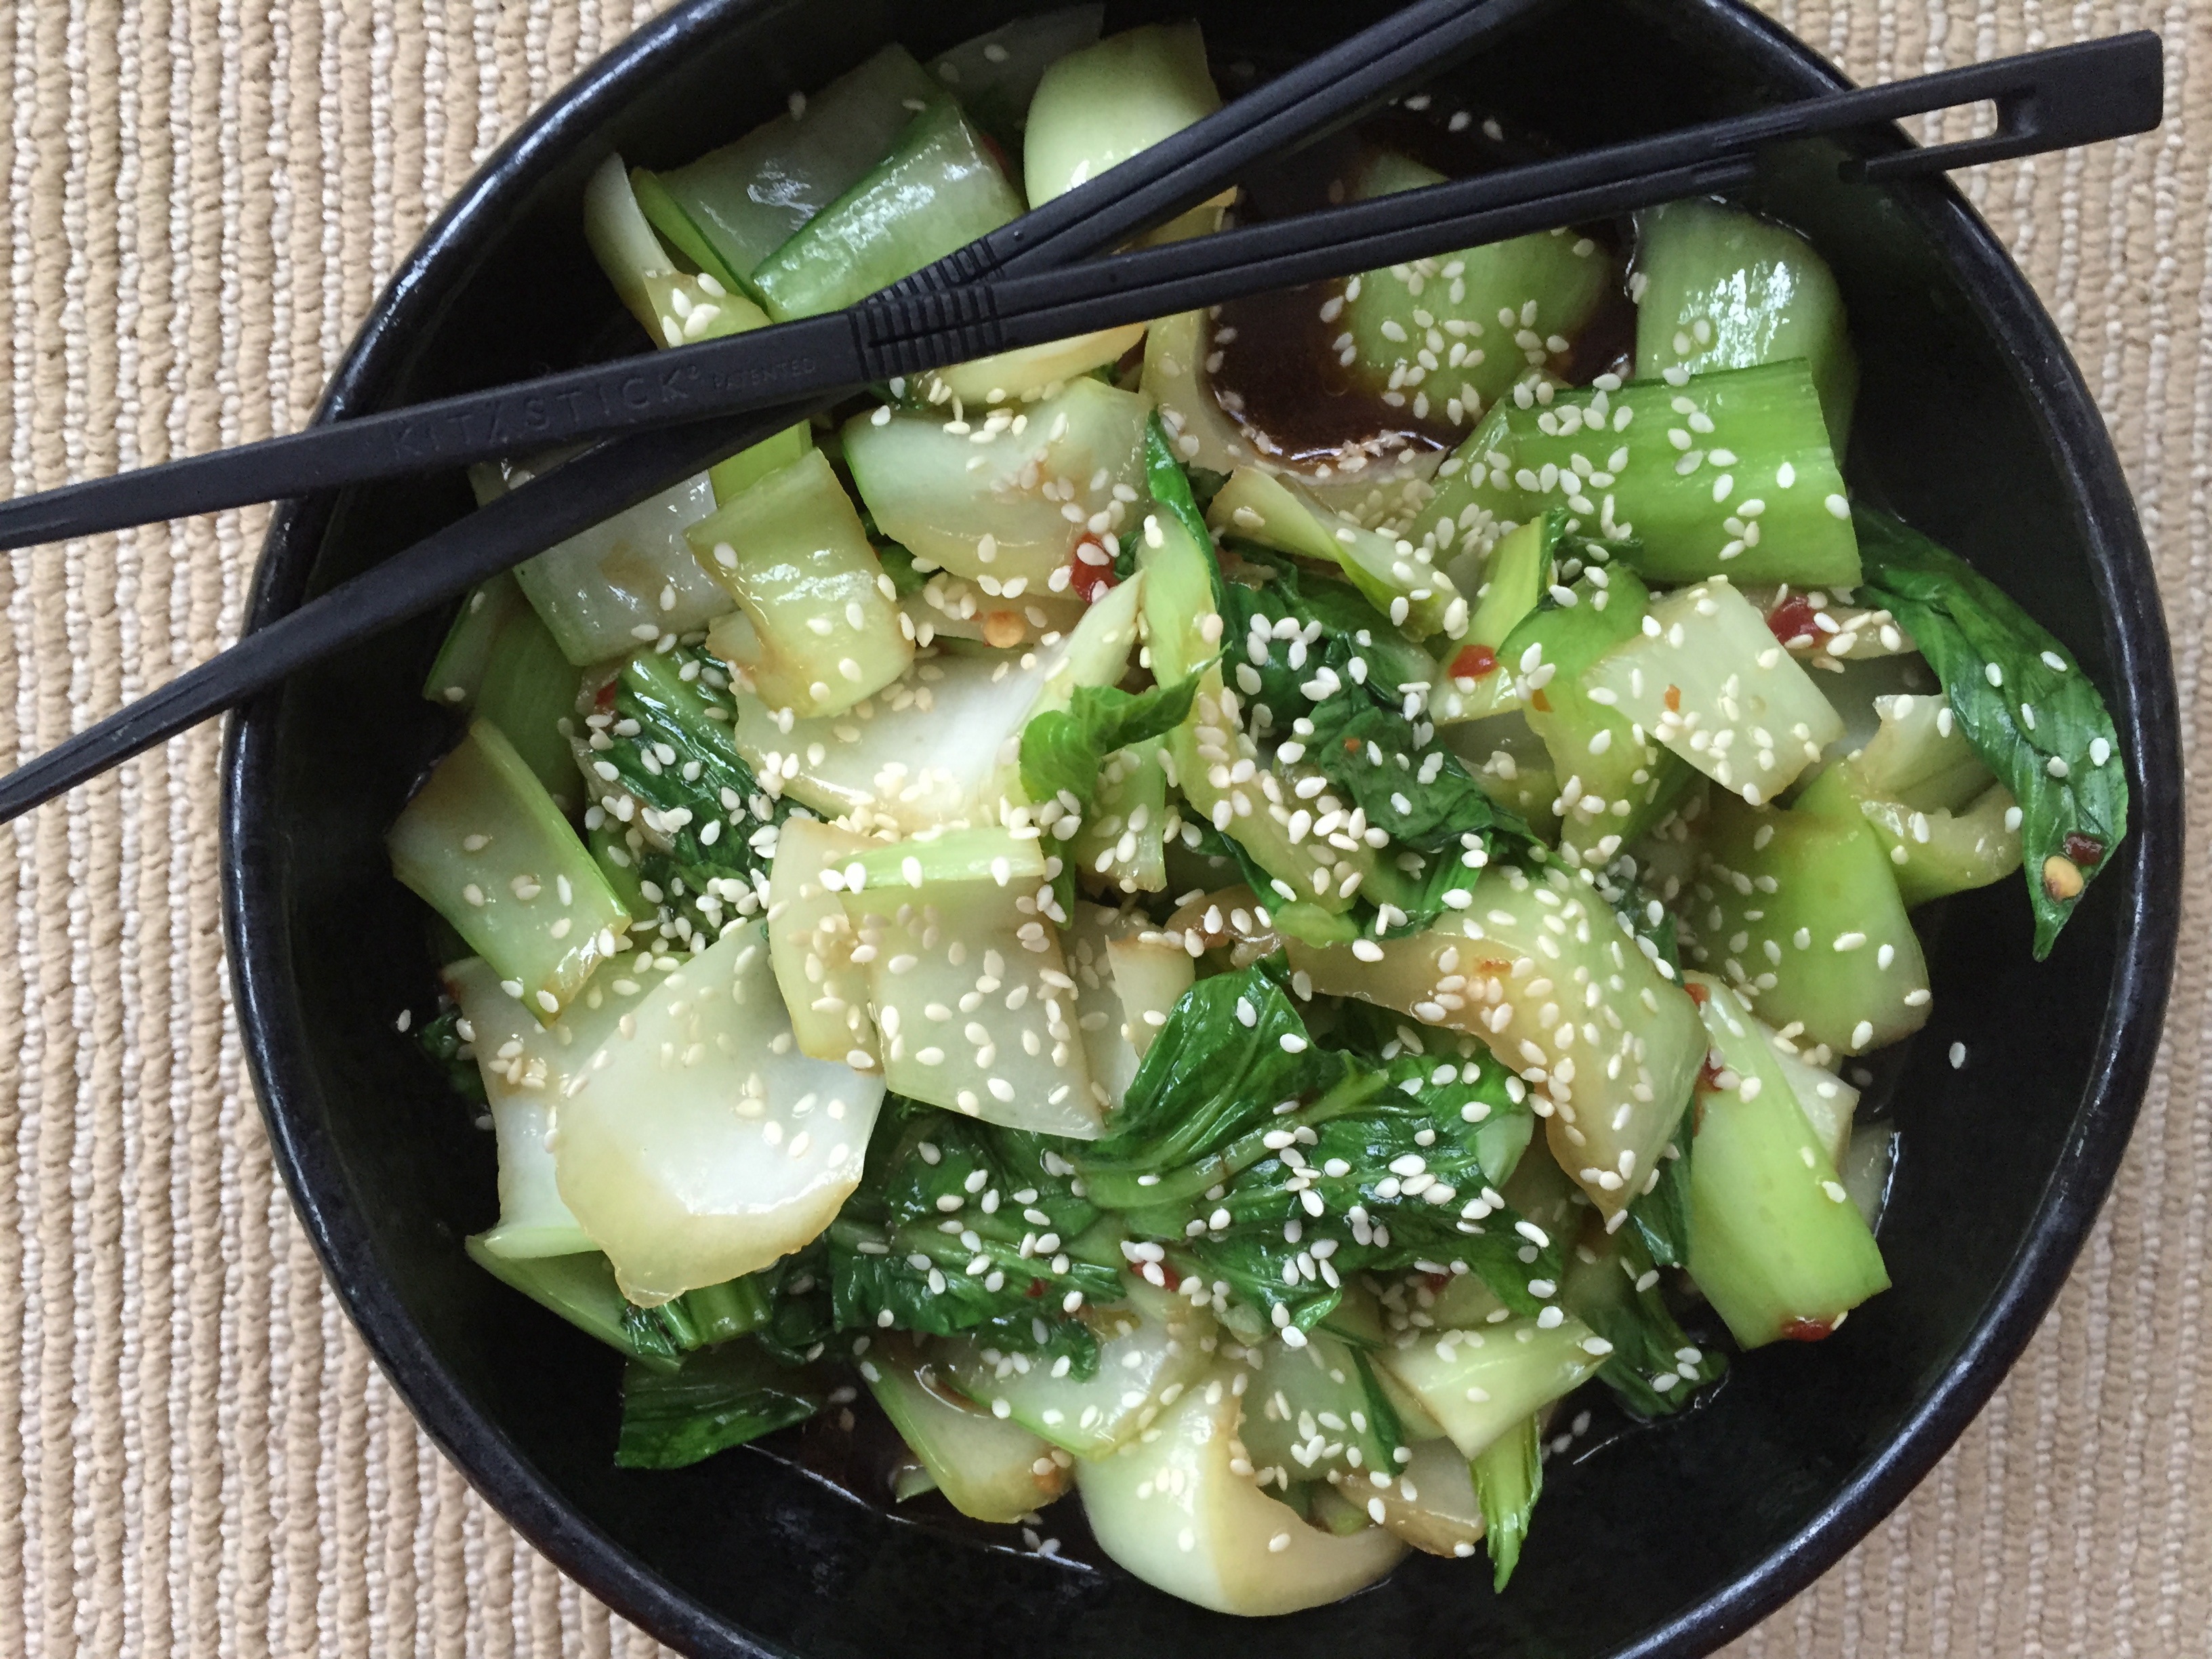
Bok choy brings a little green to the winter. photo: Nancy Duran

Right about this point in autumn, I begin to lament the lack of local green vegetables. I’m just a bit potatoed, turnipped, and squashed out. Luckily, winter bok choy is here to save the day. Hooray!

Actually, bok choy used to be my least favorite Asian green. I always had a problem with the way bok choy’s leaves would go slimy soft before the stem was tender. Turns out all I needed was a simple fix. Now, I separate the leaves and tender light green ends of the bok choy from the tougher white stems. Then, I add the stems to the boiling water to blanch them for about a minute. Just before I drain the pot, I add the leaves and light colored stems and give them a swirl in the pan just to wilt.

This preparation can be used with any Asian green (or with Western ones such as broccolini if you prefer). It’s based on a recipe of the great Chinese-Australian chef Kylie Kwong. I had the great pleasure to meet her and test her recipes when I worked at delicious magazine in Australia. She’s an inspiration to all women chefs out there. If you ever have the opportunity to visit Sydney, I highly recommend a trip to her restaurant Billy Kwong. You haven’t had Hong Kong Chinese food until you’ve been there (well, unless you live in Hong Kong that is).

You can use any Asian-style sauce in the mix here. I’ve chosen to use oyster sauce, soy, and sambal (which is actually a Southeast Asian chile paste). The secret to the recipe is in the heating of the peanut oil. To create a luscious saucy coating on the greens, you heat a 1/4 cup of peanut oil (or another oil of your choosing) to the smoking point. Once it begins to spit, pull it from the heat and pour it over the sauce covered vegetables. The sauce will let down into a broth that I invariably find myself drinking to the very last drop.

Serves 4

3 tablespoons oyster sauce
1 tablespoon light soy sauce
2 teaspoons sambal oelek*
1 teaspoon sesame oil
6 small bunches baby bok choy (about 2 pounds), coarsely chopped, leaves and stems separated into two piles
1/4 cup peanut oil
1 teaspoon sesame seeds

  1. In a small bowl, combine the oyster sauce, soy sauce, sambal, and sesame oil. Stir to combine.
  2. In a large pot of boiling, salted water, add the bok choy stems. Cook for 1 minute, until crisp-tender. Add the leaves and cook for a further 10 seconds. Drain. Place the greens in a large bowl and stir through the sauce to coat the greens.
  3. In a small saucepan, heat the peanut oil over high heat. After about 1 minute, when it is smoking and beginning to spit, remove it from the heat and carefully pour it over the greens (it will spit up a bit so be careful not to burn your arm). Toss the greens again, sprinkle with sesame seeds and serve immediately over rice.

* Note: Sambal oelek can be found in many grocery stores and in Asian markets.

Nutritional analysis based on 4 servings:
Calories 213, Fat 13g, Sodium 603mg, Carbohydrate 15g, Fiber 8g, Sugars 1g, Protein 6g

Posted in side | Tagged , , , , , , | 2 Comments

Thanksgiving Green Beans, Minus the Mushroom Soup

tgiving_haricot

A traditional green bean casserole reimagined for a modern Thanksgiving feast. photo: Nancy Duran

For those of you who don’t yet have your Thanksgiving menu nailed down, here’s one more recipe before the big day. This is my modern take on the old school green bean casserole. Mind you, I struggled with whether I should publish this recipe or not. Green beans in the northeast of the United States are not exactly seasonal food in late November. However, I figured quite of few of you would be facing the canned soup variety of this recipe and I thought it a bit of a public service to put this out there as an alternative.

In place of the more ungainly green bean, I use haricots verts that are lightly blanched and plunged in an ice bath to keep them bright green and snappy. I cook the mushrooms with shallots and white wine so that they create an earthy vegetable broth (the soup in this version). And then I finish the whole lot off with an abundance of fresh herbs, a dusting of Parmesan cheese, and a squeeze of fresh lemon. It’s light and fresh and the perfect complement to all the heavier sides on the Thanksgiving table. Happy Thanksgiving!

Serves 8

1 1/2 pounds haricots verts, stem ends trimmed
2 tablespoons olive oil
2 tablespoons unsalted butter
1/2 cup finely chopped shallots (from about 1 large shallot)
1 teaspoon fresh thyme leaves
1 pound baby bella mushrooms, stems trimmed and thinly sliced
1/2 cup dry white wine
Salt and freshly cracked black pepper to taste
1 tablespoon finely sliced fresh basil
2 teaspoons finely chopped fresh flat leaf parsley
1/3 cup finely grated Parmesan cheese
Freshly squeezed lemon, for serving

  1. First prepare an ice bath for the haricots verts. Fill a large bowl with a generous scoop of ice cubes then pour in cold water to make a slurry.
  2. In a large pot of boiling salted water, cook the haricots verts for 3-4 minutes, until just tender. Drain and immediately plunge the beans into the ice bath to stop them from overcooking. When the haricots verts have cooled down, remove them from the ice bath and dry on clean dish towels. (This step can be done as early as a day in advance. Be sure to bring the haricots verts to room temperature before cooking the mushrooms.)
  3. In the same large pot, heat the olive oil with 1 tablespoon of the butter over low heat. When the butter has melted, add the shallots. Cook, stirring and without coloring them, for about 5 minutes, until soft.
  4. Add the remaining tablespoon of butter along with the thyme leaves. When the butter has melted, add the mushrooms. Stir to coat all over with the butter then cover and cook on low heat for 5 minutes.
  5. Uncover the mushrooms and continue to cook 2 more minutes. Raise the heat to medium-high, add the wine and cook for about 3 minutes, until the alcohol has cooked off. You should still have plenty of “broth” from the liquid in the mushrooms and the wine.
  6. Add the haricots verts to the pot and stir to coat and warm (do this for no more than 1 minute so that they don’t overcook).
  7. Remove from the heat and season generously and to taste with the salt and pepper. Stir in the basil and parsley. Transfer to a serving tray and sprinkle with Parmesan and lemon juice. Serve immediately.

Nutritional analysis based on 8 servings (does not include salt, pepper, and lemon juice):
Calories 133, Fat 8g, Sodium 74mg, Carbohydrate 11g, Fiber 4g, Sugar 2g, Protein 5g

Posted in side | Tagged , , , , | Leave a comment

Two Cheese Potato Gratin

potato_gratin

Parmesan and Gruyere flavor this festive gratin. photo: Nancy Duran

My brother hosts Thanksgiving dinner each year. It’s one of the best parties of the holiday season and it’s a meal I look forward to eagerly. You see, he’s got it down to a science. While he and my sister-in-law take care of the main stays of the meal: two turkeys (one roasted, one fried), stuffing, corn, and several top notch bottles of wine, the guests are asked to bring their own specialties. My sister-in-law’s sister brings a carrot souffle that I cannot get enough of. My mom brings her famous candied yams. My brother-in-law makes about ten different types of pie. And we’ve been doing this for enough years that the kinks in all these dishes have been worked out. We are a well oiled machine.

Me, I’m in charge of the potatoes. I bring two potato gratins that are decadently delicious. A family favorite is the one I make with cheddar and our house-roasted New Mexico green chiles. But this recipe represents the basic building blocks for the perfect gratin, no matter how you end up layering in other flavors (or if you even choose to do so – it’s perfectly yummy just like this). Surprisingly, the key ingredient here is the lemon juice. It provides just the right foil to the creamy richness of the cheeses, heavy cream, and the potatoes themselves. That little hit of acidic brightness on the mouth helps to lighten the whole dish. To add other flavors simply switch out the cheeses or sprinkle over different herbs.

Make things easy on yourself and prepare this the day before. Then just heat it up, covered, on the day. I sure do hope your Thanksgiving is as tasty as I’m anticipating mine will be. And while we’re on the topic of Thanksgiving, thank you so much for checking out my blog this year. I really appreciate it.

Serves 8 to 10

3/4 cup grated Parmesan cheese
1/2 cup grated Gruyere cheese
2 1/4 pounds potatoes (I use Russet), sliced thinly into rounds*
1 large onion, thinly sliced
1/4 cup lemon juice
Salt and freshly cracked black pepper to taste
3/4 cup heavy cream
2 tablespoons dried breadcrumbs
2 tablespoons finely chopped fresh parsley
2 tablespoons unsalted butter, chopped

  1. Preheat the oven to 425°F. Grease a 9 x 13-inch casserole dish with cooking spray.
  2. In a medium bowl, combine 1/2 cup of the Parmesan with the Gruyere.
  3. Layer a third of the potato slices over the base of the casserole dish; sprinkle over a third of the onion and a third of the cheese mixture. Pour over a third of the lemon juice and season generously but to taste with the salt and pepper. Repeat with the remaining potato, onion, cheese mixture, and lemon juice. Season each layer with the salt and pepper. Pour over the cream.
  4. In a small bowl, combine the remaining 1/4 cup Parmesan with the breadcrumbs and parsley. Sprinkle this mixture all over the top of the casserole, then dot with the chopped butter.
  5. Bake, covered, about 1 hour or until the potato is tender. Uncover and bake another 10 minutes or until lightly browned.

*Peel and slice the potatoes only after you have prepared the rest of the gratin ingredients. You want to avoid leaving the peeled potatoes out so that they don’t brown.

Nutritional analysis based on 8 servings (does not include salt and pepper to taste):
Calories 257, Fat 12g, Sodium 299 mg, Carbohydrate 29g, Fiber 2g, Sugar 2g, Protein 9g

Posted in side | Tagged , , , , , | 2 Comments

Thanksgiving Tips

Even armed with the best recipes in the world, things can and will go wrong on Thanksgiving Day. But the better prepared you are for those snafus, the smoother things will run. Getting the turkey right will be 90% of the battle. So make sure you choose wisely when you pick out your poultry.

Here are a couple links to articles I’ve written for the Food Network that may help you on Big Turkey Day.

Disaster? What Disaster? 5 Thanksgiving Day Fixes

10 Tips for Cooking the Perfect Thanksgiving Turkey

Posted in Uncategorized | Leave a comment

Sausage and Fig Stuffing

sausage_stuff2

This super easy stuffing brings a little Italian flavor to the Thanksgiving table. photo: Nancy Duran

The food story that is virtually impossible to ignore throughout the month of November is, of course, Thanksgiving. In light of that, I thought I’d share some recipes with you that may help you get through the terrors of hosting Thanksgiving dinner. I can’t help you with the interpersonal family stuff. You’ll have to go that road alone. But I can help with the sides. As we all know, it’s all about the sides. The turkey is nothing without the window dressing around it.

Speaking of dressing: this recipe is technically a dressing, not a stuffing. It is not, in fact, stuffed into anything (except maybe a casserole dish but that’s stretching the definition I think). Although these terms are used interchangeably these days, dressing is actually the side that is baked in a dish and stuffing is the one packed into a bird’s cavity. But since dressing seems a little old fashioned, I chose to go with the more modern terminology. So there you go.

This recipe is based on the simple yet divine recipe that my own mother prepared each Thanksgiving. I’ve added a few bells and whistles (because I can’t help myself) but at its heart, this is my mom’s recipe. As a child, I knew Thanksgiving was just around the corner when the bread came out on trays to dry out. This usually happened about 3 days or so before the big day and that’s when I really started getting excited for the feast ahead. Don’t worry if you don’t remember (or have time) to complete this step, though. You can quickly dry the bread cubes in the oven at 300°F for about 10 minutes.

I’ve added brandy, figs, and sweet Italian sausage to my mother’s recipe, giving it a bit of an Italian twist. I love the mix of sweet and savory elements. The sage and thyme are classic accompanying herbs for poultry and the celery is key to the flavor so don’t skimp on it. I chose to use Italian bread but feel free to substitute another bread that you may favor. Your house will smell beautiful while this is cooking. And if there are leftovers, I dare you not to pick at them every time you open the fridge. Absolutely yum.

Serves 8 to 10

1 cup thinly sliced, stemmed dried mission figs
1/2 cup brandy
14 cups stale cubed Italian bread (from 1 large loaf )*
2 tablespoons unsalted butter
2 tablespoons olive oil
1 large onion, finely chopped
3 celery stalks, thinly sliced into half moons
1 tablespoon fresh thyme leaves
2 teaspoons finely chopped fresh sage leaves
3/4 pound sweet Italian pork sausage, meat squeezed from casings and casings discarded
2 cups chicken stock (more if your stuffing seems a little dry)
Salt and freshly cracked pepper to taste

  1. Preheat the oven to 375°F
  2. In a medium shallow bowl, combine the figs and brandy and macerate (soak) the figs for 30 minutes, or for the time it takes you to get the rest of the recipe together.
  3. Pour the stale bread cubes into a large bowl.
  4. In a large frying pan, heat the butter and oil over medium-low heat. When the butter has melted, add the onion and celery and cook, stirring, about 10 minutes, until the onion and celery have softened but not browned. Stir through the thyme and sage. Scrape the vegetables into the bowl with the bread and stir to combine and coat.
  5. Return the same frying pan to the stove and raise the heat to medium-high. Add the sausage and cook, stirring and breaking up the meat with a fork, until the sausage is no longer pink, 5 to 7 minutes. Add the figs and brandy and cook, stirring, for about 2 minutes, until the alcohol burns off. Scrape the sausage and figs into the bowl with the bread and stir to coat and combine.
  6. Pour half the stock over the bread mixture and stir to combine. Then pour the other half of the stock over the bread and stir again. Season to taste with salt and pepper, stirring so that the seasoning is evenly distributed. Depending on the bread you use, you may need a little more stock. Take a look at the stuffing mix. It should be evenly moistened but not swimming in liquid. Transfer to a 9 x 13-inch casserole dish and bake for 30 minutes, until browned on top and heated throughout.

Nutritional analysis based on 8 servings (does not include salt and pepper to taste):
Calories 350, Fat 12g, Sodium 605 mg, Carbohydrate 44g, Fiber 4g, Sugar 11g, Protein 13g

Posted in side | Tagged , , , , , | 2 Comments

Dinner Party Roasted Lamb

plated_lamb

This combination makes for a lovely and stress-free autumn dinner party meal. photo: Nancy Duran

I thought I’d share with you how I served the Roasted Leg of Lamb with Turnips, Potatoes, and Red Wine Gravy. If you’ve got entertaining ahead of you (and I’m sure many of you do as the holiday season approaches), this is a complete dinner that elegantly feeds a crowd. You’ll look restaurant-ready without having to pull off restaurant-style hours to get this menu together.

I served the lamb on a puree of carnival squash (the more common acorn squash would do just fine as a substitute). The sweet, fragrant taste and luscious, velvet texture of the squash puree proved a perfect complement to the full flavored lamb and gravy. I rounded out the dish with my Roasted Brussels Sprouts with Pomegranate. Although these side recipes serve six, with all the other sides on the plate there is plenty to feed a larger crowd.

For dessert, I suggest my German Apple Tart and a nice bottle of Sauternes. You’ll have happy guests indeed.

Here’s the recipes for the squash puree:

Serves 6

2 teaspoons olive oil
2 tablespoons brown sugar
1 teaspoon ras el hanout
1 small squash (about 1 1/2 pounds), halved and seeds scooped out
1/2 cup heavy cream
1/2 cup chicken or vegetable stock
1/2 teaspoon salt, plus more to taste

  1. Preheat the oven to 400°F. Line a rimmed baking tray with aluminum foil.
  2. In a small bowl, combine the oil, sugar, and ras el hanout.
  3. Place the squash halves, cut-side up, on the baking tray and pour the flavored oil over both halves. Use your hands to rub the oil all over the squash flesh.
  4. Bake for 50 minutes, until very tender.
  5. In a medium saucepan over low heat, warm the cream, stock, and salt. Do not bring to a boil. Pour into the bowl of a food processor.
  6. Scoop the squash flesh out of its skin and add to the warmed cream mixture in the food processor. Process until smooth and creamy. Adjust the salt to taste.

Note: Ras el hanout is a Morroccan spice blend of cinnamon, cumin, peppers, and turmeric. Although it sounds super exotic, it’s actually readily available. Most supermarkets should carry it since it is available through McCormick spices.

Nutritional analysis for squash puree based on 6 servings:
Calories 96, Fat 6g, Sodium 229mg, Carbohydrate 12g, Fiber 1g, Sugar 3g, Protein 1g

Posted in main, side | Tagged , , , , , , , | Leave a comment

Roast Leg of Lamb with Turnips, Potatoes, and Red Wine Gravy

leg_lamb

Roasted lamb and vegetables to feed a crowd. photo: Nancy Duran

The Zuehlsdorff Family Farm has delivered the goods yet again. This boneless leg of lamb is the very last piece of meat left from my meat share delivery of this past year. Talk about saving the best for last. I mean look at that gorgeous photo! This roast turned out succulent, flavorful, absolutely divine.

I know roasting a whole leg of lamb can sound like a daunting task, but, in truth, it’s so much easier than you think. Have your butcher do the hard work of tying or netting it up and all you need to do is whip up a fragrant rub or marinade (in this case a garlic-rosemary concoction) and stick it in the oven. It even takes less time than you might think: for medium rare, right around an hour and a half  for a 6-pound roast should do it. So the next time you’re entertaining a larger crowd, dig this recipe out of your back pocket. You will impress the pants off your guests, I guarantee it. And you won’t even break a sweat.

PS. More adventures in roasting meat are up ahead. I pick up my newest shipment of Zuehlsdorff Family Farm meat next Sunday.

Serves 12 to 14/Makes about 2 cups gravy

Roast Lamb and Vegetables
1 boneless leg of lamb (6 to 7 pounds), rolled and tied or netted (have your butcher do this)
3 garlic cloves, finely chopped
Finely grated zest of 1 lemon
1 tablespoon lemon juice
1 tablespoon seeded mustard
1 tablespoon chopped fresh rosemary leaves, plus 5 sprigs
2 tablespoons chopped fresh flat leaf parsley leaves
1/4 cup extra virgin olive oil
Salt and freshly ground pepper to taste
3/4 pound turnips (about 4 small), trimmed, peeled, and cut into large chunks
1 pound potatoes, unpeeled and cut into large chunks
1 cup chicken stock, plus more if needed

Red Wine Gravy
1 cup dry red wine (I used Syrah)
1 1/4 cups chicken stock
1 1/2 tablespoons all-purpose flour
Salt and cracked black pepper to taste

  1. To make the Roasted Lamb and Vegetables: Take the lamb out of the refrigerator at least 30 minutes prior to cooking time so that it can come to room temperature. Pat the lamb dry all over with a paper towel and cover it while you get on with making the marinade.
  2. Preheat the oven to 400°F.
  3. In a small bowl, combine the garlic, lemon zest and juice, mustard, chopped rosemary, parsley, and oil. Season to taste with salt and pepper and stir to combine.
  4. Into a large roasting tray, place the turnips and potatoes. Scatter over the rosemary sprigs. Place the lamb on top of the vegetables, skin-side up. Rub the marinade all over the lamb and season again with more salt and pepper. Pour the stock over the vegetables around the lamb.
  5. Roast the lamb and vegetables for about 1 hour 30 minutes for medium rare, or until a meat thermometer inserted into the thickest part of the lamb registers 130 to 135°F. Halfway through cooking time, rotate the pan so that the lamb browns evenly all over and add a little more chicken stock if the pan looks dry. Stir the vegetables to coat them all over with the liquid in the pan. Transfer the lamb to a large cutting board, loosely tent with aluminum foil, and rest for 15 to 20 minutes. Using a slotted spoon, transfer the vegetables to a large bowl and cover to keep warm.
  6. To make the Red Wine Gravy: Place the roasting pan with meat drippings across two burners on the stovetop. Heat the pan to medium-high heat, add the wine and bring to a simmer, stirring and scraping up any browned bits on the bottom of the pan (that’s where all the flavor is). Simmer until the liquid is reduced by about half.
  7. Add the stock and sift in the flour while stirring (this will prevent lumps). Continue to simmer and stir until the gravy thickens slightly (enough to coat the back of the wooden spoon). Adjust the seasonings to taste and strain into a gravy boat. Skim excess fat off the top.
  8. Cut the netting or tied kitchen string off the lamb and slice thickly or thinly (depending on your preference). Serve with the roasted vegetables and gravy.

Nutritional analysis based on 12 servings (does not include salt and pepper to taste):
Calories 428, Fat 18g, Sodium 276 mg, Carbohydrate 11g, Fiber 1g, Sugar 2g, Protein 49g

Posted in main | Tagged , , , , , , , , | 1 Comment

Roasted Brussels Sprouts with Pomegranate

brus_sprout_pom

Brussels sprouts and pomegranate are fall favorites. photo: Nancy Duran

When I was a little girl, I used to love pomegranate season. I remember my dad slicing open this exotic red fruit, then bending back the tough skin and gently extracting the sweet, juicy seeds for me to snack on. When I saw pomegranates at the market today, I realized that I hadn’t yet passed this tradition on to my little ones. So I gathered up a couple and brought them home with the intention of sharing them with my boys. In the meantime, this happened.

Pomegranates are lovely in savory dishes and Brussels sprouts are a classic companion. Luckily, I had Brussels sprouts in the fridge from Sunday’s CSA pickup. The sweet tangy pop of the pomegranate seeds is a nice complement to the earthy cabbage flavor of the sprouts. Often this dish is sweetened even more with the addition of molasses or pomegranate syrup. I find, though, that just a touch of brown sugar gives the dish a sufficiently sweet edge.

This is a great side to have in your repertoire for Thanksgiving entertaining. It looks really pretty on the table and provides a fresh twist on a holiday favorite.

Serves 6

2 pounds Brussels sprouts, trimmed, outer leaves removed
1/4 cup olive oil
1 teaspoon salt
1/8 teaspoon cracked black pepper
2 tablespoons lemon juice
1 teaspoon light brown sugar
3 tablespoons toasted sliced almonds
3/4 cup pomegranate seeds (from about 1/2 pomegranate)
1 teaspoon finely grated lemon zest

  1. Preheat the oven to 400°F.
  2. Halve any Brussels sprouts that are on the larger side and leave the smaller sprouts whole. In a large bowl, toss the sprouts with the oil, salt, and pepper. Pour onto a rimmed baking sheet that is large enough to fit the sprouts all in one layer. Place in the oven and roast for about 30 minutes, until browned and tender.
  3. Meanwhile, make the dressing in a small bowl by combining the lemon juice and sugar. Whisk to dissolve the sugar.
  4. Transfer the roasted sprouts into a medium serving bowl and add the almonds, pomegranate seeds, zest, and dressing. Toss to combine and coat. Serve warm or at room temperature.

Nutritional analysis based on 6 servings:
Calories 170, Fat 11g, Sodium 416mg, Carbohydrate16g, Fiber 6g, Sugar 6g, Protein 5g

Posted in salad | Tagged , , , , | 1 Comment

German Apple Tart

apple_tart

A tart inspired by travels abroad. photo: Nancy Duran

There’s nothing quite like travel to get the creative juices flowing. New sights, new sounds, new smells, and new tastes inevitably bring me inspiration. Even the memory of meaningful journeys from long ago can be enough to spark a fresh idea.

Many years ago my friend Christina lived in Berlin, and I, being young and unencumbered, was only too happy to visit her there. This was a time when I never turned down an opportunity to travel to far flung reaches simply to say hi to a friend. I fell absolutely head over heels in love with this beautiful, bohemian city. The art, the architecture, the history, and the food affected me greatly. In that sea of beauty, somehow I never forgot an unassuming German pastry I enjoyed there. It was something between an apple cake and an apple tart, featuring a delicate pastry crust, sweet tender apples, a springy cake, and a gorgeous crumble topping.

This taste memory has lasted all these years but for some reason I’ve never attempted to recreate it myself. Until now that is. To create my own version, I turned to my more recent friend named Christine, who also, funnily enough, hails from Germany. She kindly took the time to share her mother’s version of this recipe and her own memories of the many different adaptations she has enjoyed over the years. This recipe is the result of that inspiration and, if I might say so myself, I think it’s a pretty lovely ode to the traditional pastry I had all those years ago.

In developing my tart, I decided to skip the cake interior and stick with a more classic tart set up. I have my own shortcrust pastry recipe that I’ve been baking for years and it’s wonderfully light and delicate. I love that it can quite easily be pressed into the tart tin. No rolling necessary. But, in the end, this tart is all about the apples. I used a sweet eating apple called the Blondie but you can use another type if you like. I would, however, stick with a sweet apple and stay away from the sour varieties like Granny Smith. I added very little sugar to this pastry, depending instead on the sweetness of the fruit.

I was overjoyed to get a solid thumbs up and rave reviews from Christine. Now I just need to get Christina to make the long hard trip from New York City out to the ‘burbs. I was thinking that perhaps a slice of German apple tart might lure her out…

Serves 8 to 10

Shortcrust Pastry
1 cup all-purpose flour, plus extra for dusting
1/4 teaspoon salt
3/4 stick (6 tablespoons) cold unsalted butter, cut into cubes
2 tablespoons confectioners’ sugar
1 large egg yolk
1 teaspoon finely grated lemon zest
2 to 4 tablespoons ice water

Crumble Topping
3/4 cup all-purpose flour
1/2 cup firmly packed light brown sugar
1 stick (8 tablespoons) cold unsalted butter, cut into cubes
3/4 cup sliced almonds

appletart_piece

Subtly sweet shortcrust, tender apples, and a brown sugar and almond crumble make this German Apple Tart irresistible! photo: Nancy Duran

Filling
3 medium Blondie apples, peeled, cored, and thinly sliced (not too thin – about 1/4-inch thick)
Juice and finely grated zest of 1 lemon
2 tablespoons light brown sugar


  1. First, make the pastry: In the bowl of a food processor, add the flour, salt, and butter. Pulse just until the ingredients come together and resemble coarse meal. Add the sugar, egg yolk, zest, and 2 tablespoons of the water and process to combine. Add more water, a tablespoon at a time, just until the dough comes together into a ball. Be careful not to over-process or your dough will become tough.
  2. Turn the dough out onto a surface that has been lightly dusted with flour and give it a turn through the flour. Using the balls of your fingers, gently press the dough into a 9-inch round removable-base fluted tart tin. Press up the sides and around the entire base of the tin to create an evenly covered surface with no holes in the dough. Place on a baking tray in the refrigerator for at least 30 minutes to chill while you get on with the rest of the tart.
  3. Preheat the oven to 375°F.
  4. While the pastry is chilling, make the Crumble Topping: In a medium bowl, combine the flour and sugar. With your fingers, rub in the cubes of butter so that the butter incorporates with the dry ingredients to create a clumpy crumble. Stir through the almonds.
  5. Now prepare your Filling: In a medium bowl, combine the apples, lemon juice and zest, and sugar. Mix to coat all over.
  6. Remove the chilled pastry from the refrigerator. Top the pastry with the apple slices. Scatter over the crumble topping and then place in the oven to bake for about 35 minutes, until golden brown and bubbling. Cool completely in the tin, slice, and serve.
Posted in dessert | Tagged , , , , , | 1 Comment

Sweet Roasted Cauliflower and Broccoli

cauli_broc2

This vegetable medley pairs up nicely with a hearty meat dish. photo: Nancy Duran

Though not actual candy, these veggies taste almost as sweet. Roasting broccoli and cauliflower at a high temperature has the wonderful effect of caramelizing them, bringing out their natural sweetness. I love to bring these two vegetables together. Cauliflower delivers a mellow sweetness that is the perfect foil to broccoli’s more intense, cabbage-like flavor. Broccoli florets, however, will cook much faster than cauliflower florets. So instead of separating cauliflower into florets, I thinly slice it. That way I can toss the two vegetables onto the same tray and cook them for the same amount of time. I’m all about efficiency.

When I was struggling to get my kids to open up to these vegetables, I found that roasting them worked a charm. No big surprise there. Most 8-year olds have a pretty healthy sweet tooth so caramelized roasted vegetables were like a revelation to them. Sure this dish will never replace their love of Halloween candy, but it’s nice to have them coming to the dinner table looking forward to the veggie side. When it comes to a plate of vegetables for a pair of little boys, really, can you ask for anything more?

This recipe is just about the simplest rendition of what you can do with cauliflower and broccoli, perfect for the whole family. By all means, though, jazz it up with your own additions if you like. When I feel like getting fancy, I mix in everything from pistachios to raisins, curry powder to cumin. But when I just want to get a plate of nicely cooked vegetables to the table quickly, this is my go-to recipe.

Serves 6 as a side

1 small head cauliflower
1 small head broccoli, cut into florets
3 garlic cloves, thickly sliced
1/3 cup olive oil
Salt and cracked black pepper to taste
Finely grated zest of 1 lemon

  1. Preheat the oven to 450°F.
  2. To prepare the cauliflower, slice the head in half and then into quarters. Slice out the inner core, then slice horizontally into each quarter to create roughly 1/2-inch-thick slabs.
  3. On a large rimmed baking sheet, place the cauliflower slices, broccoli florets, and garlic slices and drizzle over the oil. Toss to coat all over with the oil. Season to taste with salt and pepper and toss again. Bake for 15 minutes, until tender and turning golden.
  4. Sprinkle over grated lemon zest and serve.

Nutritional analysis based on 6 servings (does not include salt and pepper to taste):
Calories 153, Fat 12g, Sodium 47mg, Carbohydrate 10g, Fiber 4g, Sugar 3g, Protein 4g

Posted in side | Tagged , , | Leave a comment