Pasta Tossed with Sugar Pumpkin Puree

pumpkin_spaghetti-e1508353717741.jpg

This delicious pasta just goes to prove, pumpkin puree is not just for pumpkin pie. photo by Nancy Duran

Pumpkins are on just about every front porch this time of year. But rarely do you see them in the kitchen. And that’s a shame. Because little sugar pumpkins are really very tasty and versatile. They certainly live up to their sweet namesake and they are easier to prepare than you might think. My recommendation is, get yourself some of these little pumpkins and roast them up to make yourself a couple batches of puree. It freezes great and can be used in everything from pumpkin soup to pumpkin pie, right on down to this tasty pumpkin pasta.

Serves 6

1 small sugar pumpkin (2 to 3 pounds)
1 tablespoon olive oil
1 pound spaghetti
2 tablespoons unsalted butter
1 large shallot, finely chopped
1/3 cup sour cream
1/3 cup grated Parmesan cheese, plus more for serving
Pinch of ground allspice
Salt and freshly ground black pepper
3 tablespoons finely chopped fresh flat-leaf parsley

  1. You’ll need to roast the pumpkin so that you have fresh pumpkin puree for your pasta. Preheat the oven to 375°F. Line a baking tray with parchment paper.
  2. Place your pumpkin on a large cutting board and get yourself a sharp knife. To halve the pumpkin, first, give yourself a flat edge. This way it won’t roll around on your cutting board. Make a shallow cut horizontally across the top (stem end) of the pumpkin to remove the stem. Turn the pumpkin upside down and create the same type of cut on the bottom to create another flat edge. Now it is safe to cut through the pumpkin lengthwise so that you can cleave it in half to expose the seeds.
  3. Next, you’ll need to remove the seeds. I like to use a serrated grapefruit spoon to do this but if you don’t have one just use a regular spoon and some elbow grease. Remove the pulp and seeds. Separate the seeds from the pulp and set them aside to roast with the seasonings of your choice. (They make a great snack.)
  4. Place the pumpkin halves, flesh side-down, on the prepared baking tray. Bake for 45 to 50 minutes, until the skin is soft enough so that when you gently press on it, it dimples. When the pumpkin is cool enough to handle, using a large spoon, scoop out the flesh. One 2 to 3 pound pumpkin should yield around 2 cups of puree.
  5. Bring a large pot of salted water to the boil. Add the spaghetti and cook according to package directions. Before draining, reserve 1 cup pasta cooking water. Drain and rinse the pasta in the colander under running water to remove excess starch. Place the drained pasta in a large bowl.
  6. Meanwhile, heat the butter in a small frying pan over low heat. Add the shallot and cook, stirring, until softened, about 3 minutes.
  7. Place the pumpkin puree, cooked shallots (along with the butter in the pan), sour cream, grated Parmesan, all spice, and reserved pasta water in the bowl of a food processor. Process until smooth. Season to taste with salt and pepper.
  8. Pour pumpkin puree mix over pasta and stir well to combine and coat all over. Served topped with fresh parsley and extra grated Parmesan.

Nutritional analysis based on 6 servings (does not include salt and pepper to taste):
Calories 396, Fat 11g, Sodium 101 mg, Carbohydrates 60g, Fiber 3g, Sugar 3g, Protein 12g

Posted in lunch, main | Tagged , , , , , | Leave a comment

Warm Potato and French Bean Salad

bean_potato

I like to use haricot vert in this salad, which are the thin green beans often seen in French cuisine. But if you can’t get your hands on them, feel free to substitute regular green beans. photo by:  Nancy Duran

This is the type of salad that’s perfect for the cooler nights of late summer and early autumn. Because it’s best served warm, it’s just the right side for a crisp, clear night. Be sure to let the dressing soak into the potatoes and beans for 10 minutes or so before serving. All that bright tangy flavor will be absorbed into the creamy potatoes and will coat the snappy beans.

Serves 4

1 pound baby medley potatoes, halved
1/2 pound haricot vert, trimmed and halved crosswise on the angle
1 small shallot, finely chopped
1 tablespoon wholegrain mustard
1 tablespoon white wine vinegar
1/4 cup extra virgin olive oil
1 celery stalk, thinly sliced
Salt and freshly ground pepper to taste
1/4 cup coarsely chopped fresh flat leaf parsley

  1. Bring a large pot of salted water to a boil. Add potatoes and cook 10 to 12 minutes, until just tender but not falling apart. Cook haricot vert in a small pot of salted boiling water until crisp-tender, about 3 minutes.
  2. Meanwhile, make dressing in a small bowl by whisking shallots, mustard, vinegar, and oil until combined.
  3. In a large serving bowl, combine drained potatoes and haricot vert, celery, and dressing. Add salt and pepper to taste. Stir gently to coat and combine. Let sit for 10 minutes for flavors to absorb. Just before serving, add parsley. Can be served warm, at room temperature, or cold.

Nutritional analysis based 4 servings (does not include salt and pepper to taste):
223 Calories, 14g Fat, 63mg Sodium, Carbohydrates 23g, Fiber 4g, Sugar 2g, Protein 3.5g


Posted in lunch, main, salad, side | Tagged , , , , , , , , , | Leave a comment

Balsamic Roasted Peppers and Tomatoes with Pancetta

pepper_tomato

This pepper, tomato, and pancetta roast will melt in your mouth. It can be served piled onto crusty bread, tossed through pasta, or simply scooped up as it is.  photo: Nancy Duran

This is the time of year when you don’t have to do much to your produce to bring out its great taste. Mother nature has got the flavor angle completely covered. Two of the vegetables that are at the top of their game right now are bell peppers and tomatoes. Most of the time, serving them simply sliced into a salad is all the work you’ve got to do in the kitchen. But when you’re looking for something just a bit sexier, and without a lot of extra prep, the “bang ’em in a pan and roast them with pork” option is always a good one to turn to. This one pan delight is sweet, tangy, and meltingly delicious whether you serve it on bread, in pasta, or over grilled meat.

2 red, yellow, or orange (or a mixture) bell peppers, sliced into strips
1 pound cherry tomatoes
5 ounces chopped pancetta
4 garlic cloves, 1 finely chopped and 3 thickly sliced
Salt and freshly ground black pepper to taste
1/2 cup pitted Kalamata olives
1 tablespoon capers
2 tablespoons balsamic vinegar
Crusty Italian bread or pasta, for serving
Small fresh basil leaves, for scattering

  1. Preheat the oven to 400°F.
  2. In a large roasting pan, combine the peppers, tomatoes, pancetta, and garlic and season with salt and pepper to taste. Be careful not to over salt as the pancetta is salty. Stir to coat and combine. Cook 40 minutes, until tomatoes are collapsing, peppers are tender, and pancetta has rendered most of its fat.
  3. Remove from the oven and stir in olives, capers, and vinegar. Scatter over basil leaves just before serving. Can be served hot or at room temperature.

Nutritional analysis based on 4 servings: (does not include salt and pepper, basil, bread or pasta)
Calories 237, Fat 18g, Sodium 508 mg, Carbohydrates 14g, Fiber 3g, Sugar 4g, Protein 6g


Posted in appetizer, brunch, lunch, main, side, snack | Tagged , , , , , | 1 Comment

Savory Grilled Peaches

grilled_peaches

Sweet, salty, and sour: this dish hits all the right notes for a late summer appetizer. photo by: Nancy Duran


Simply grilled peaches are a delicious and unexpected break from tomatoes on the savory table. In just minutes, they grill to perfection. They also happen to pair nicely with soft, tangy cheeses, and salty meats. This is what summer eating is all about: casual dishes made of fresh-from-the-farm ingredients that go from kitchen to plate in no time at all.

Serves 8 as an appetizer

4 (just ripe) peaches, halved along seam and pit removed
olive oil, for brushing
Freshly cracked black pepper to taste
Prosciutto, soft sheep and goat milk cheese, fresh basil leaves, for serving

Heat grill to medium-low heat. Brush peaches all over with olive oil and brush the grill grates with a little more. Add peaches, cut side down and cook, uncovered and without turning, about 4 minutes, until beginning to release juices and nicely grill marked on the cut side. Gently lift peaches with a spatula and flip to grill the skin side. Grill a further 4 minutes. Serve with prosciutto and cheese, scattered with basil leaves and seasoned with pepper.


Posted in appetizer, brunch, side, snack | Tagged , , , , | Leave a comment

Lemon Squares with Herbed Blueberries

blueberry_lemon

Toss blueberries in unexpected herbs to liven up a simple lemon tart. I’ve used thyme but lavender would be just as lovely. photo by Nancy Duran

As we approach late summer, blueberries are bountiful. While they are just perfect eaten fresh by the handful, if you’re in the mood to dress them up a bit, give this lemon curd tart a whirl. Blueberries tossed in honey and herbs add a grown up twist and make this tart beautiful to look at. The recipe may look a little daunting but, trust me, it’s a snap to pull together. Because the tart base is a press in, it’s very forgiving. While the aroma will tempt you, hold off on slicing the tart until it is completely cooled, preferably with a little time in the fridge to help it set even more. This will result in nice clean squares that can be eaten by hand or fork.

Makes 16 squares

Shortcrust Pastry
1 stick unsalted butter (8 tablespoons), at room temperature, chopped
1/3 cup confectioners’ sugar
1 teaspoon finely grated lemon rind
1 cup all-purpose flour

Lemon Curd Filling
1 cup granulated sugar
2 tablespoons unsalted butter, at room temperature, chopped
2 teaspoons finely grated lemon rind
3 large eggs
1/2 cup lemon juice

Herbed Blueberries
1 cup blueberries
2 teaspoons honey
2 teaspoons fresh thyme leaves

  1. Preheat the oven to 350°F. Grease and line the base of an 8-inch square pan with parchment paper, leaving paper overhanging on two sides so you can lift the tart out of the pan easily.
  2. To make the Shortcrust Pastry: In the bowl of an electric mixer (or using a hand mixer), cream the butter, icing sugar, and lemon rind until smooth. Add the flour and mix until just starting to come together. Using your hands, press the mixture together to form a ball. It will be crumbly, but don’t worry, you should be able to press it together using your hands. Take the ball of dough and drop it into the prepared pan. Press the dough into all the corners of the pan until the base is evenly covered. Bake 15 to 18 minutes, until lightly browned.
  3. To make the Lemon Curd Filling: In the cleaned out bowl of the electric mixer (or using a hand mixer), beat together the granulated sugar, butter, and lemon rind. The mixture will not cream but should instead look like coarse breadcrumbs. Add the eggs one at a time, waiting until each addition is incorporated. Add the lemon juice and mix until just blended (do not over mix).
  4. Carefully pour the lemon curd onto the hot pre-baked pastry base. (You can do this straight on the oven rack to avoid spillage.) Return to the oven and continue baking for another 10 minutes.
  5. Meanwhile, in a small bowl, toss the blueberries with the honey and thyme. When the lemon tart has baked for 10 minutes, carefully remove from the oven and scatter over the blueberries, pressing them gently into the curd so that they adhere. Return to the oven and cook another 10 minutes, until the lemon curd is set. Remove from the oven and cool completely in the pan before slicing into 16 squares.


Posted in dessert, snack | Tagged , , , , , , , | Leave a comment

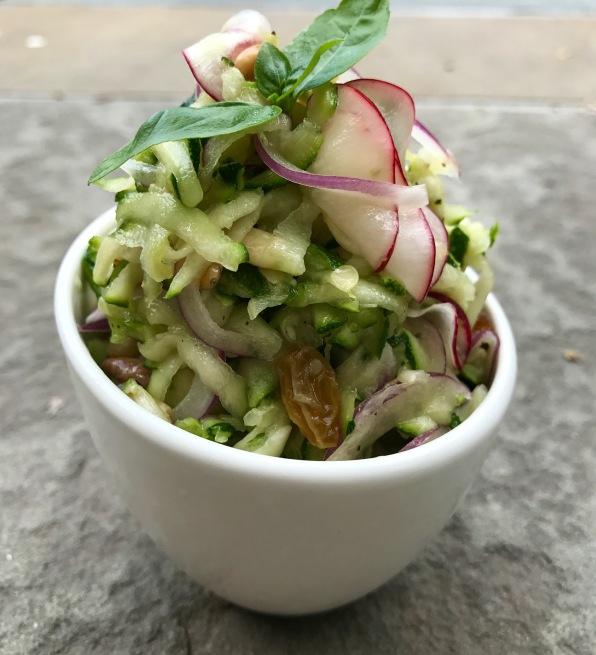
Zucchini Slaw


zuke_slaw

Hamburgers, grilled chicken, sausage, and steak. These are the mainstays of outdoor summer cooking. And keeping them from getting stale by the end of July can be tricky after the ninth or tenth barbecue. That’s where fresh and bountiful summer vegetables come in. Just about now, zucchini is making itself known in most quarters, so why not put it to use in jazzing up your grilled meat staples?

This quick slaw is a delicious, fresh topper for just about any meat, or fish for that matter. It’s sweet, tangy, nutty, and crunchy and adds just the right amount of flash to a simply grilled meat. I like to add pine nuts to mine but it’s not mandatory if you’re looking for something completely raw (on those hot and steamy days when turning on the oven or lighting the stovetop seems absolutely unbearable).

And fear not my vegetarian friends, slaw is not for meat eaters alone. I also love this topper on “meaty” grilled haloumi or eggplant slices.

Makes 4 cups

2 medium zucchini, grated on the coarse side of a box grater
1/2 small red onion, very thinly sliced
3 large radishes, thinly sliced into rounds
1/3 cup roasted pine nuts
1/3 cup golden raisins
Juice from one large lemon (about 4 tablespoons)
3 tablespoons extra virgin olive oil
1 tablespoon honey
3/4 teaspoon salt
A handful of fresh basil leaves, sliced thinly
Freshly cracked black pepper to taste

  1. In a colander set in the sink, place the grated zucchini and, using your hands, press out any excess water. Transfer to a large bowl and add the onion, radish, pine nuts, and raisins.
  2. In a screw-top jar, combine the lemon juice, oil, honey and salt. Shake vigorously to combine and pour over the zucchini mixture. Toss to coat all over and let sit for about 20 minutes, until the flavor are infused and the zucchini and onion have slightly pickled. If there is still a lot of moisture, place in a colander to drain excess moisture. Return to the bowl and add the basil and pepper to taste. Serve on top of meat, chicken, fish, or grilled vegetables or cheese.

Nutritional analysis based on 1/4 cup serving (does not include black pepper to taste):
Calories 62, Fat 4.5g, Sodium 113 mg, Carbohydrate 6g, Fiber 1g, Sugar 4g, Protein 1g

Posted in condiment, main, salad, side, snack | Tagged , , , , , | Leave a comment

Peas and Carrots and Ramps (oh my!)

A classic pairing updated for modern palettes. photo by Nancy Duran

Late spring days can be unpredictable. One day it’s 90 degrees and sunny, the next it’s rainy and a chilly 60 degrees. During those brisk interludes, I retreat inside from my barbecue to roast a spring chicken. And the side I prefer with my chicken is a homey carrots and peas. Freshly shelled spring peas feel like an absolute luxury after many winter months of frozen peas. This simple yet stunning preparation puts the peas in the spotlight they deserve.

You may be coming across ramps at your farmers’ market these days, and if you do, I encourage you to pick some up. Their subtle sweetness provides a lovely accent to the crisp freshness of the peas and carrots in this dish. If you can’t find ramps (and they can be elusive), feel free to substitute two finely chopped small shallots. The flavor won’t be identical to ramps, but the sweetness will be achieved.

2 tablespoons unsalted butter
10 ramps, white bulbs only sliced thinly into rounds (save leaves for another use)*
Salt and freshly ground pepper to taste
2 cups carrots that have been thinly sliced into matchsticks
2 cups lightly cooked freshly shelled peas
Extra-virgin olive oil, for serving

  1. In a medium saucepan, heat butter over medium-low heat. Add ramps and a little salt and pepper and cook, stirring occasionally, until ramps have softened, but not colored, about 3 minutes.
  2. Add carrots and toss to coat with butter. Pour in about 1/2 cup water and turn heat to medium-high. Cook, uncovered, until carrots have softened and liquid has mostly evaporated, about 5 minutes. Add cooked peas and taste and season with a little more salt and pepper. Serve drizzled with olive oil.

* A great way to use the ramp leaves is to stuff them into the cavity and under the skin of the breast meat of a whole chicken. When you roast the chicken the sweet oniony flavor of the ramps will infuse the chicken and its gravy.

Nutritional analysis (based on 4 servings, does not include salt and pepper to taste or olive oil for serving):
Calories 146, Fat 6.2g, Sodium 52 mg, Carbohydrate 19g, Fiber 6g, Sugar 8g, Protein 5g

Posted in side | Tagged , , , , , | Leave a comment

Eat Your Greens!


green_goddess

This scrumptious dressing makes it easy to be green.  photo by Nancy Duran

An early summer salad gets a dose of fun with this Green Goddess Dressing tailor made for little ones. If you’re looking to entice the kids into the kitchen and get them bought into the idea of eating their greens, “no-cook” cooking like this is a great place to start. Little hands can get involved making this yummy, creamy dressing which just happens to be the perfect complement to all sorts of vegetables.

While traditional Green Goddess Dressing features anchovies, I’ve subbed in Worcestershire sauce so that kiddos won’t turn their noses up. The salty, briny flavor of the sauce will hit similar notes. (But, by all means, if you love anchovies like I do, skip the Worcestershire sauce and toss in two anchovy fillets instead.)

Toss a little bit of the dressing with whatever baby greens you find at the market this week. Be careful not to go too heavy on the dressing as a little bit goes a long way. It saves in the fridge for up to a week and makes a great dip for raw veggies as well. My guess is, this fun to make and fun to eat dressing will make the kiddos want to dig right in.

Makes 1 1/4 cups dressing

Ingredients

1/2 cup olive oil mayonnaise
1/2 cup plain Greek yogurt
2 tablespoons lemon juice
1 tablespoon extra virgin olive oil
2 teaspoons Worcestershire sauce
1 cup tightly packed fresh basil leaves
1 small garlic clove, roughly chopped
1 tablespoon fresh tarragon leaves
2 teaspoons roughly chopped fresh chives
Salt and freshly cracked black pepper to taste

In the bowl of a food processor, combine all the ingredients except salt and pepper and add 1 tablespoon water. Blend until smooth and creamy. Season to taste with salt and freshly ground black pepper. Use this dressing on salads or as a dip for vegetables.

Nutritional analysis based on serving size of 2 tablespoons (does not include salt and pepper to taste):
Calories 106, Fat 11g, Sodium 89 mg, Carbohydrate 2g, Fiber 0g, Sugar 1g, Protein 1g

Posted in appetizer, salad, Uncategorized | Tagged , , , , , , , , | Leave a comment

Fragrant Squash Soup Shots

squash_shooter

Curry and coconut flavor this butternut squash soup. It’s a perfect way to introduce your Thanksgiving feast. photo by Nancy Duran

Getting this one in under the wire! Two more sleeps until Turkey Day so there’s still time to add this stunning soup to your feast. I love a good butternut squash soup but I often find it very heavy. This rendition, however, is so silky and airy that you won’t fill up before the turkey and stuffing make their grand appearance. Flavored with fragrant green curry paste and light coconut milk, this soup is a beautiful way to get the taste buds ready for the feast ahead. Serve it in shot glasses or little mugs either at the table or during the pre-dinner cocktail hour.

Makes 9 cups

1 tablespoon vegetable oil
1 tablespoon unsalted butter
1 medium shallot, thinly sliced
2 small butternut squash (about 3 pounds), peeled, seeds scooped out, and flesh chopped
1/3 cup green curry paste
1 tablespoon brown sugar
2 cans (13.66 ounces) light coconut milk (shaken)
2 cups chicken or vegetable stock
Salt and freshly cracked black or white pepper to taste
1/4 cup very finely chopped fresh cilantro
Juice of 1 lime

  1. In a large Dutch oven or soup pot, heat the oil and butter over medium-low heat. When the butter has melted, add the shallot and cook, stirring, until soft, about 3 minutes. Add the squash and stir to coat with the shallot and butter. Add the curry paste and sugar and stir to coat the squash. Cook, stirring, for about 2 minutes.
  2. Pour in the coconut milk, stock, and 2 cups of water. Bring to a simmer (not a fierce boil), reduce heat to low and cover. Cook for about 20 minutes, until the squash is tender. (You may see the soup split if the boil becomes too rapid. Don’t worry, once you puree, it will all come together.)
  3. Pour the soup into a blender and puree in batches until smooth. (If the soup is hot when you pour it into the blender, be careful that the top of the blender doesn’t blow off when you puree!) Return to a cleaned out pan and season to taste with salt and freshly cracked black or white pepper. Stir in the cilantro and lime juice and serve warm.

Nutritional analysis based on 36 (1/4 cup) servings
(does not include salt and pepper to taste):
Cal 87, Fat 7g, Sodium 102 mg, Carbohydrate 9g, Sugar 1g, Fiber 0g, Pro 4g

Posted in lunch, main, side, snack, soup | Tagged , , , , , , | Leave a comment

Late Summer Stew

eggplant_peppers

The bounty of a late summer harvest is on full display in this quick prep stew. photo by Nancy Duran

Funnily enough, the end of summer is actually my favorite part of this season. I love the cooler nights, the hint of autumn in the air, reclaiming my schedule, and the return of friends from far flung summer adventures. But, of course, I especially love the bounty of the late summer harvest. Gardens, farmers markets, and CSAs are in peacock mode in the late days of August and throughout the month of September.

This easy, easy stew is an homage to all the goodies coming out of the ground right now. Eggplants, onions, and peppers are brought together with a puree of fresh summer tomatoes and topped off with baby spinach and fragrant basil.

You can enjoy this stew as I’ve written it here with boneless chicken thighs, or try it as a vegetarian main. It’s delicious served over pasta or with crusty, hearty peasant bread. And don’t skip the yogurt. The tangy finish really seals the deal.

Serves 4

2lbs skinless, boneless chicken thighs
Salt and freshly ground pepper to taste
1/4 cup plus 1 tablespoon olive oil
1 medium onion, chopped
1 large red pepper, chopped
1 large eggplant, chopped
3 garlic cloves, thinly sliced
2 tablespoons tomato paste
1 teaspoon ground coriander
1/2 teaspoon ground cumin
1/3 cup apple cider vinegar
2 large tomatoes, halved and grated for pulp on the large holes of a box grater (discard the skin)
1/2 cup chicken or vegetable stock
A large handful of baby spinach
Fresh basil and Greek or Bulgarian yogurt for serving

  1. Pat the chicken dry with paper towels and season it all over with salt and pepper. In a large Dutch oven, heat 2 tablespoons of the oil over medium-high heat. When hot, add the chicken in two batches and brown on both sides, about 3 minutes on the first side and 2 minutes on the second side. Transfer to a plate.
  2. Add the remaining 3 tablespoons of oil to the pan and stir in the onion, pepper, and eggplant. Cook, stirring occasionally, until the vegetables are softened, 12-15 minutes. Add the garlic, tomato paste, coriander, and cumin and cook, stirring for about 1 minute, until fragrant.
  3. Pour in the vinegar and cook, scraping the bottom of the pan to lift off any brown bits, for about 1 minute, until almost evaporated. Add the tomato pulp, stock, and the chicken and juices to the pan. Push the chicken down into the stew juices. Increase the heat to medium to bring to a simmer, then reduce heat and cover. Cook, covered, for 10 minutes.
  4. Just before serving, stir in the spinach to wilt slightly. Taste and add more salt and pepper to taste. Serve topped with shredded basil and fresh yogurt.

Nutritional analysis based on 4 servings (does not include salt and pepper to taste and basil and yogurt for serving):
Calories 516, Fat 27g, Sodium 309 mg, Carbohydrate 19, Fiber 7g, Sugars 9g, Protein 48g

Posted in main | Tagged , , , , , , | Leave a comment