Sauteed Spaghetti Squash and Collards

spagsquash_collard

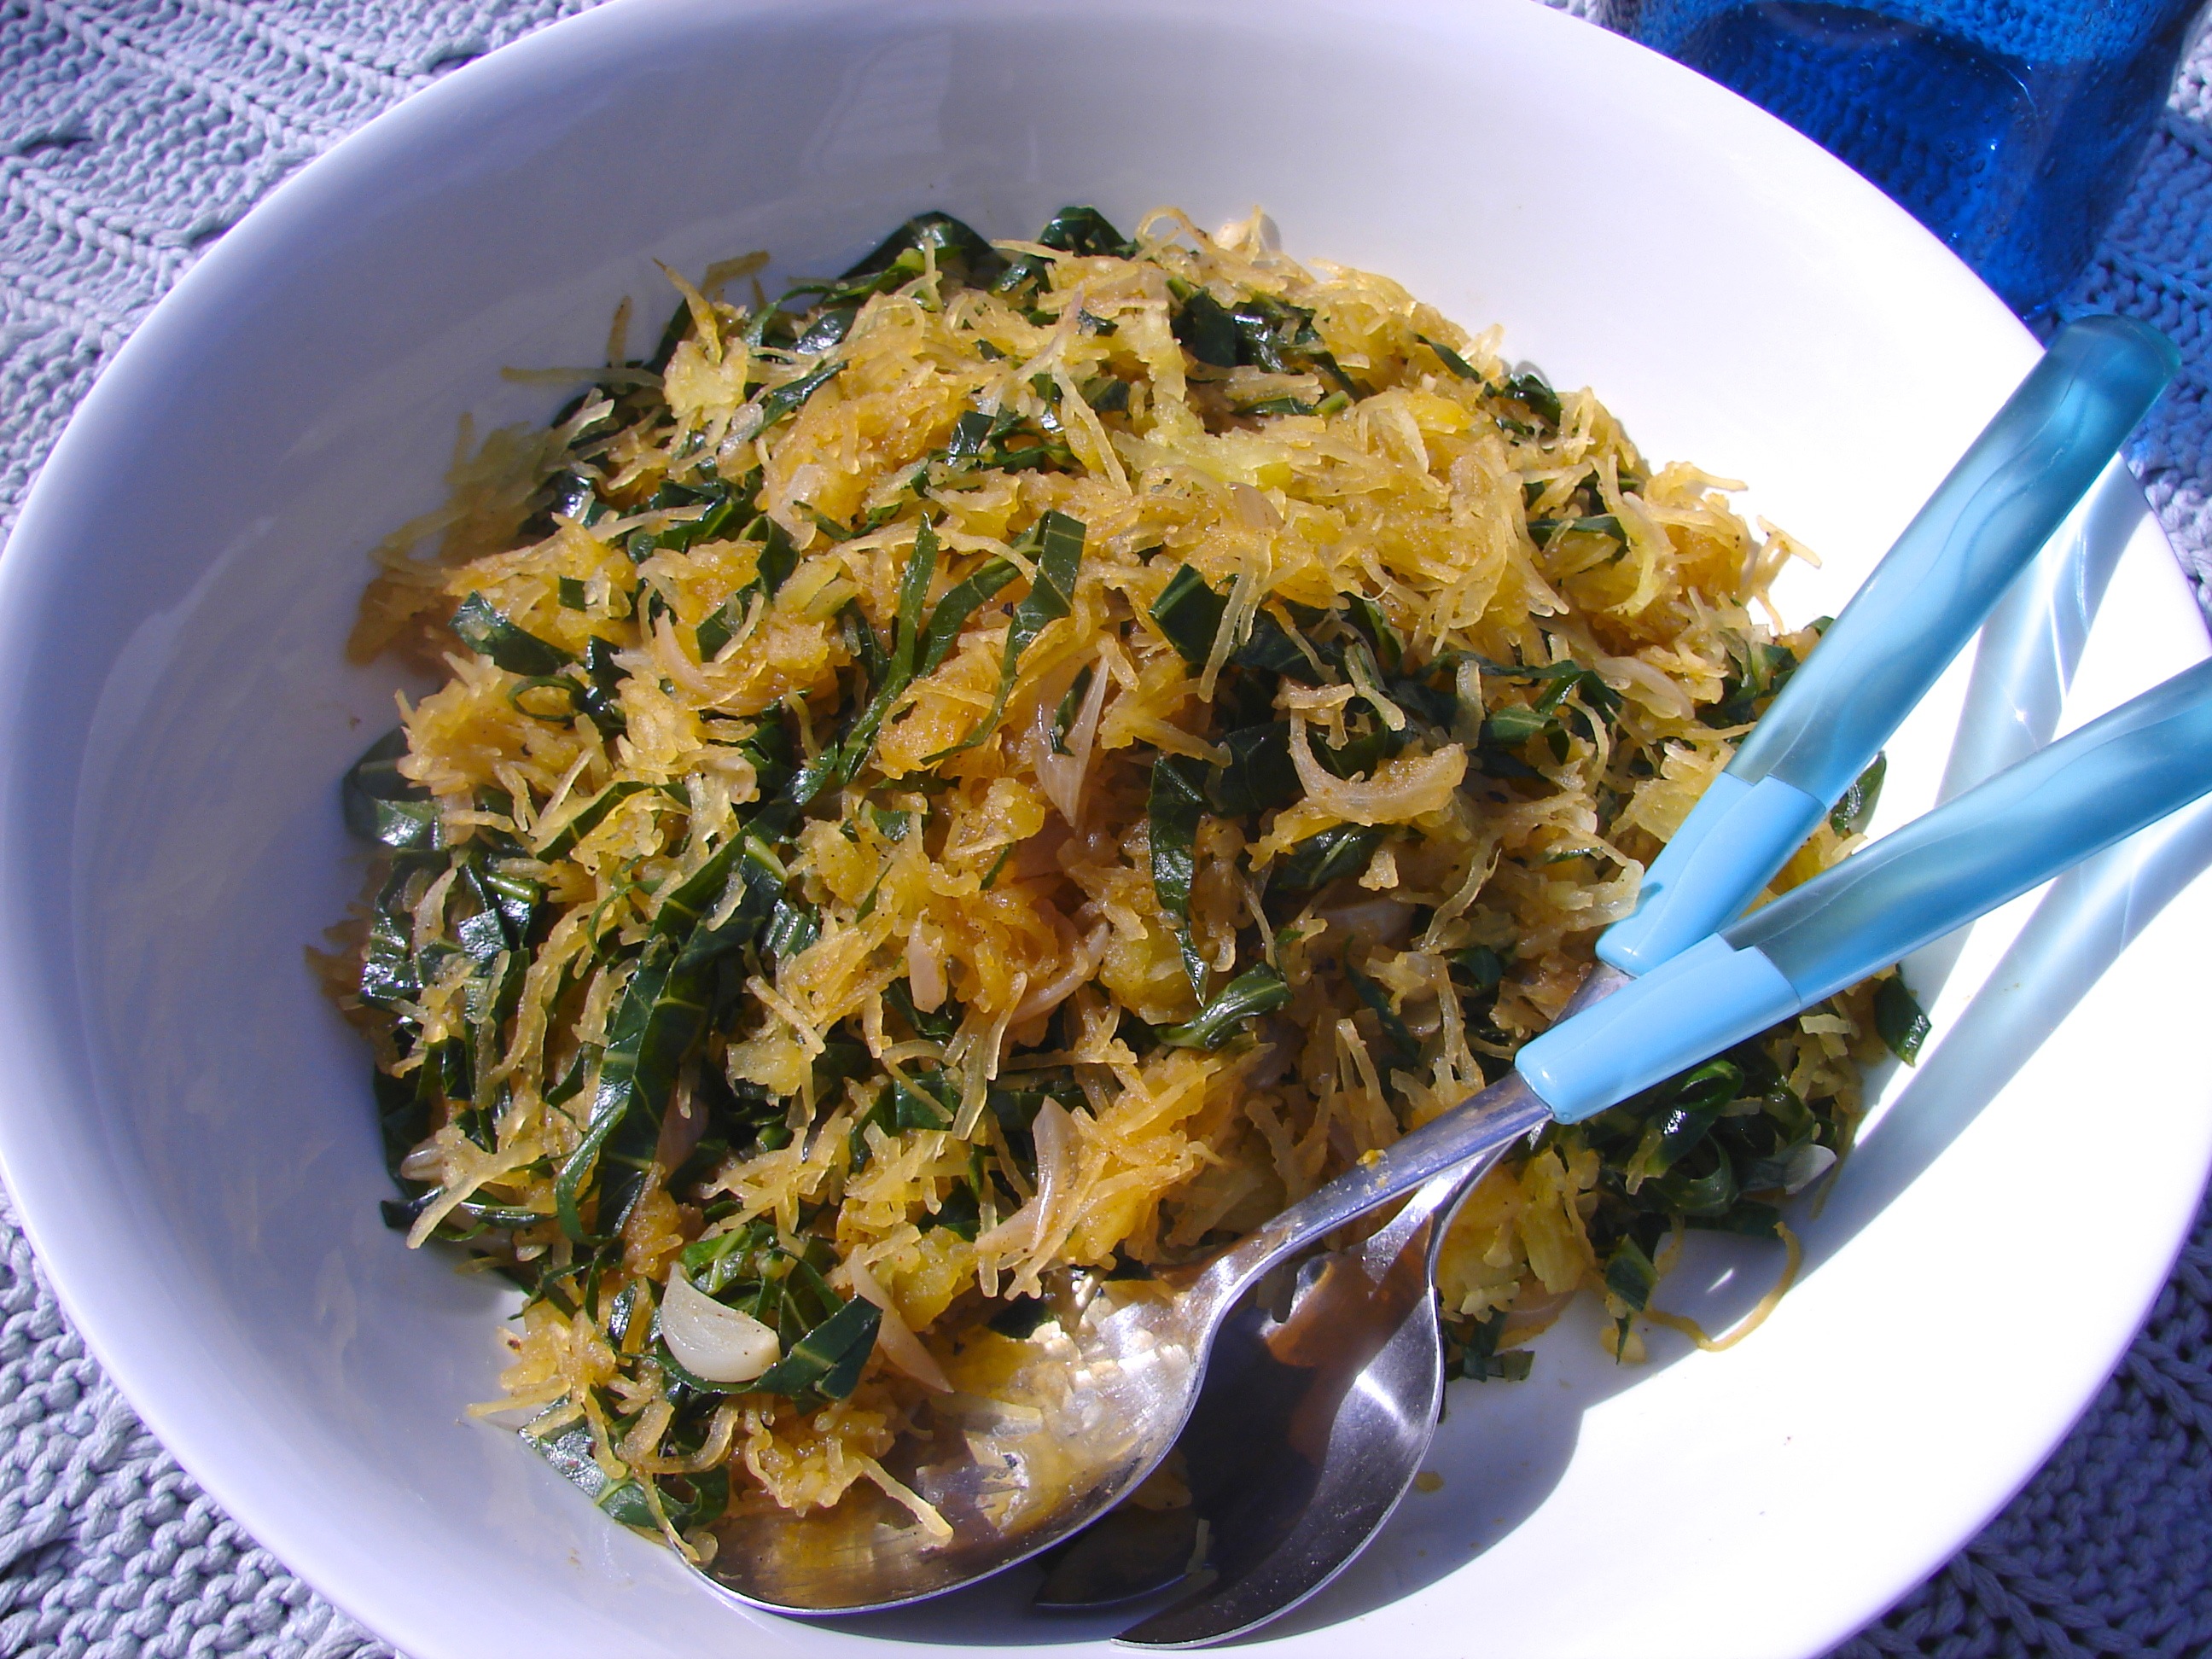
Move over carbs! Spaghetti squash finds its voice. photo: Nancy Duran

Spaghetti squash and collard greens, they’ve always left me a bit cold. The in-your-face flavor of collards is generally too bitter for my taste unless, of course, it’s cooked down Southern-style, with a nice salty ham hock. But then you lose the crispness that I love so much in leafy greens. On the other hand, spaghetti squash features a subtle flavor bordering on boring. Little did I know that putting these two polar opposites together would create the magic I’ve always felt they were missing. The subtle sweetness of the spaghetti squash is the perfect balance to the boldness of crisp, quickly cooked collards.

To be perfectly honest, one of the reasons I don’t get jazzed up about spaghetti squash is that I dread getting it open. Cutting through the thick shell can be downright dangerous and I don’t savor the task. But then I learned the little trick of cooking them whole and cutting them after they’ve softened in the oven. Pre-roasting makes cutting through the tough skin as easy as slicing through butter. No injuries necessary.

You’ll note that I’ve included an exact amount of salt in this recipe. That’s because the collards need it to help leach out their natural bitterness. And the finish with lemon juice is just about essential to complete the collards’ journey from bitter to beautiful.

Serves 4 as a side

1 small spaghetti squash (about 2 pounds)
1 tablespoon olive oil
3 small shallots, thinly sliced
1 bunch collard greens, tough inner stems removed, leaves shredded
1/4 cup chicken stock, vegetable stock, or water
1 1/2 teaspoons chili powder
1/2 teaspoon salt
Cracked black pepper and a squeeze of lemon, to serve

  1. Preheat the oven to 375°F.
  2. Place the whole spaghetti squash on a rimmed baking sheet. Using a small, sharp knife, prick the skin all over. Bake for 1 hour. When cool enough to handle, cut the squash in half lengthwise and scoop out and discard the seeds. Scoop out the flesh and place in a medium bowl. Using a fork, break the squash up into its spaghetti-like strands.
  3. Meanwhile, in a wide, deep saucepan, heat the oil over medium-low heat. Add the shallots and cook, stirring, for 4 to 5 minutes, until softened. Add the collards and stir to coat all over. Add stock or water, cover and let cook for 5 minutes.
  4. Uncover and sprinkle with the chili powder and salt. Add in the cooked squash and toss to coat and combine. Serve with fresh cracked pepper and a squeeze of lemon.

Nutritional analysis based on 4 servings (using chicken stock):
Calories 126, Fat 5g, Sodium 369mg, Carbohydrate 20g, Fiber 2g, Sugar 0g, Protein 3g

Posted in side | Tagged , , , | Leave a comment

Chocolate Cherry Tomato and Bell Pepper Tart

tomato_tart

The beauty of a late summer harvest packed into one awesome tart. photo: Nancy Duran

Tomatoes and peppers and onions oh my! Late summer vegetables are in full swing. But at this point in the summer, I’ve had about 9 million tomato salads and I’m ready to put them to more inventive uses. That means tarts and jams and sauces are entering the picture.

A free form tart like this one is tailor made for those who normally run screaming from the thought of flouring surfaces and rolling out dough. I promise you, this is so much easier to make than its impressive finish would suggest. Unless you are of a mind to make your puff pastry from scratch (and I tell you that lesson in culinary school still gives me cold sweats), making free form tarts from store-bought frozen puff is a great option.

This combination of chocolate cherry tomatoes, pretty little yellow tomatoes, sweet red bell pepper, and even sweeter red onions is a combo made in heaven. On top of all that sweetness, I lightly caramelize everything by cooking the vegetables down with a couple teaspoons of sugar and some syrupy white balsamic vinegar. The essence of summer never tasted so good.

Serves 4 as an appetizer

Flour, for dusting surface
1 sheet frozen puff pastry, thawed
1 large egg, lightly beaten
2 teaspoons unsalted butter
2 teaspoons olive oil
1/2 small red onion, thinly sliced
1 small red bell pepper, thinly sliced
1/2 pint chocolate cherry tomatoes, halved if small, quartered if large
1/2 pint yellow cherry tomatoes, halved
1 teaspoon granulated sugar
1 tablespoon white balsamic vinegar
Sea salt and cracked black pepper to taste
Fresh basil leaves, for garnish

  1. Preheat the oven to 425°F.
  2. On a piece of parchment paper that has been lightly dusted with flour, roll out the puff pastry to a 10 x 12-inch rectangle. Fold in the edges to make a 1/2 inch border all the way around, pressing down so that they adhere to the dough. Transfer to a rimmed baking tray large enough to hold the dough. Place another piece of parchment over top and pour over blind baking beans to weigh down the dough. (If you do not own blind baking beans, you can pour over real dried beans (not canned!) to weigh down the pastry.) Place in the oven and bake for 10 minutes.
  3. Remove from the oven and take off the top piece of parchment and the baking beans. Push the pastry down in the places that it has bubbled up and risen. Brush all over with the beaten egg. This will make your crust shiny and will help it brown nicely all over.
  4. Meanwhile, in a medium frying pan, heat the butter and oil over medium-low heat. Add the onion and bell pepper and cook, stirring, about 8 minutes, until softened. Add the tomatoes, sugar, and vinegar and cook 2 more minutes, to cook down the vinegar. Season with salt and pepper to taste. (This step can be done in advance. If the topping has been refrigerated, bring to room temperature before placing on the pastry.)
  5. Spoon the tomato topping onto the pre-baked pastry and return to the oven. Cook for about 10 minutes, until puffed and golden. Sprinkle with basil leaves and serve.

Nutritional analysis for 4 servings:
Calories 154, Fat 10g, Sodium 53mg, Carbohydrate 13g, Fiber 2g, Sugar 5g, Protein 4g

Posted in appetizer, brunch, lunch, side, snack | Tagged , , , | 1 Comment

Red Potato Nicoise with Seared Scallop

nicoise_scallop

A new take on nicoise. photo: Abigail Weber

Here’s another dish featuring the spoils of my good friends’ garden. During our visit, my boys learned how to get into the dirt and dig for potatoes, an activity I highly recommend for 8-year old boys, or girls for that matter! After they did the dirty work, I was only too happy to put the buried treasure they found to good use.

This elegant salad plates so beautifully. But don’t be fooled by how dainty it looks because it’s just as satisfying. I decided to serve my nicoise with seared scallops, as opposed to the traditional tuna. Really, though, you can serve it with just about any protein you like. Or leave out the protein altogether. If you do, however, choose to go with scallops, let me give you a couple of tips for cooking scallops successfully. They can be tricky to get just right at home and I’m not too proud to admit that I’ve had my share of failures with them. But once you get them right, they can be really divine and they provide a fine accompaniment to this late summer salad.

Serves 4

Creamy Dressing
1/3 cup creme fraiche (or sour cream)
1 tablespoon Dijon mustard
1 tablespoon white balsamic vinegar
1 small garlic clove, grated
2 teaspoons olive oil

Salad
1/4 pound haricot vert, stem ends trimmed
1 pound baby red potatoes, sliced 1/4-inch thick
1/2 small red onion, finely sliced
3 cups firmly packed mixed baby lettuce leaves
1 tablespoon capers, rinsed and drained
1/4 cup loosely packed fresh flatleaf parsley leaves
1 tablespoon fresh dill fronds
12 seared sea scallops

  1. To make the dressing: In a small bowl combine all the ingredients with 1 tablespoon of water. Mix well to combine.
  2. To make the salad: Bring a large pot of salted water to the boil over medium-high heat.
  3. Meanwhile, prepare an ice bath by filling a medium bowl with ice cubes and water. This will be used to quickly cool down the haricot vert when you pull them from the boiling water in which they are cooked.
  4. Add the haricot vert to the water and cook for about 3 minutes, until crisp-tender. Using a slotted spoon, remove the beans from the water and place them directly in the ice bath.
  5. Add the potatoes to the pot and cook for about 8 minutes, until tender but still holding their shape. Using a slotted spoon, remove from the water. Discard boiling water.
  6. While the potatoes are cooling to room temperature, in a large bowl, combine the onion, lettuce leaves, capers, parsley, dill, and cooled and dried haricot vert. Toss to combine. Divide between four plates.
  7. Add the potatoes to the salad plates and drizzle the plates with all but 1 tablespoon of the dressing. Add the seared scallops and drizzle the remaining dressing over the scallops.

Nutritional analysis based on 4 servings (does not include scallops):
Calories 162, Fat 6g, Sodium 142mg, Carbohydrate 24g, Fiber 4g, Sugar 3g, Protein 4g

Posted in appetizer, lunch, main, salad, side | Tagged , , , , , , | Leave a comment

Tips to Perfectly Seared Sea Scallops

A perfectly seared scallop features a crunchy brown crust and a sweet and creamy middle that is a thing of culinary beauty. But recreating restaurant quality scallops at home can be tricky. I’ve found success following these simple steps. If you’re a scallop fan, these tips may be just the ticket for you to find your own scallop perfection.

  1. First and foremost, make sure your scallops are very, very dry before they hit the pan. Improperly dried scallops are the biggest deterrent to properly cooked scallops. (A mistake I’ve made before as well, believe you me!) Unfortunately, most of the scallops you’ll find as a home cook have been soaked in a chemical to whiten them. This soaking makes them very wet. Ask your local fishmonger for “dry” scallops. You never know, they might be able to get them for you. And if you can’t get “dry” scallops, dab the heck out of them with paper towel before you even think about putting them in the pan.
  2. Speaking of the pan, it’s got to be super, super hot before a scallop gets anywhere near it. I prefer to use a heavy cast iron pan.
  3. Use a mixture of butter and a high burning point oil to cook your scallops. That means, no olive oil! Grapeseed oil is my favorite for this type of job. But canola oil will do just fine.
  4. Don’t crowd your pan. Do a few scallops at a time so that your pan stays hot.
  5. Cook the scallops on each side for no more than 2 minutes, depending on their size. And leave them be on each side for the entire cooking time. That way they will develop a nice crust.
  6. Serve scallops immediately. They are not nice when they sit around. So make sure all your other prep work and cooking is done and start cooking the scallops only when everything else is plated up and ready to be served.


Posted in tips | Tagged , , , | Leave a comment

Corn on the Cob, Three Ways

corn_cob

Corn on the cob and a trip around the world. photo: Abigail Weber

With temperatures in New York topping out in the low 90’s yesterday and predicted to hover around 88 today, Mother Nature has clearly proclaimed that summer is far from over. The kids may be back in school (and amen for that) but there is still plenty of barbecuing and beach going to be had. At this lovely time of year, corn is at its sweetest, crispest, most delicious peak. It’s the perfect beach or poolside food on a hot late summer day.

Most of the time, I’m a minimalist when it comes to corn, I skip both the butter and the salt and enjoy it just as it is. But when I’m in the mood to dress it up a bit, I like to get creative. These three ideas for jazzing up your corn cob should get your creative juices flowing too. The sky really is the limit when it comes to the spreads that work with corn. I think you’ll find that it’s a beautiful palette on which to paint.

How I Like to Grill Corn
There are also about a million and one ways to cook ears of corn. You can boil, steam, roast, or grill. And within those methods there are variations involving husk or no husk, tin foil, or bare. My preference is to grill corn after it has been husked (and thoroughly stripped of silk). First I lightly grease each ear with spray oil. I grill on direct heat for about 5 minutes, turning it occasionally so that it blackens in places on all sides. Then I move it to indirect heat and close the lid for 7 to 10 minutes more. Lastly, I enjoy my corn with a cold beer spiked with lime. Perfection.

Toppings for 6 grilled ears of corn:

Indian style
1/3 cup 2% Greek yogurt
1 teaspoon garam masala
2 teaspoons lime juice
2 tablespoons chopped fresh cilantro

  1. In a small bowl, combine the yogurt, garam masala, and lime juice and mix to combine well.
  2. Spread each ear of corn with about 1 tablespoon of the spiced yogurt. Sprinkle each with 1 teaspoon of the cilantro and serve.

Calories 131, Fat 1g, Sodium 16mg, Carbohydrate 30g, Fiber 4g, Sugars 1g, Protein 5g

Indonesian style
1/3 cup mayonnaise
1 tablespoon sriracha
4 tablespoons salted peanuts, crushed*
Snipped fresh chives, to garnish

  1. In a small bowl, combine the mayonnaise and the sriracha (add the sriracha a teaspoon at a time to ensure you reach your optimal spice level)
  2. Spread each ear of corn with about 1 tablespoon of the sriracha mayonnaise. Sprinkle each with 2 teaspoons of crushed peanuts and chives to garnish. Serve.

Calories 268, Fat 16g, Sodium 221mg, Carbohydrate 31g, Fiber 4g, Sugars 0g, Protein 7g

Italian
2 tablespoons extra virgin olive oil
6 tablespoons finely grated Parmesan cheese
1 1/2 teaspoons crushed red pepper flakes
1 1/3 teaspoons sea salt

Drizzle each ear of corn with 1 teaspoon of oil and roll in 1 tablespoon of cheese. Sprinkle each with 1/4 teaspoon of pepper flakes and 1/4 teaspoon of sea salt and serve.

Calories 185, Fat 7g, Sodium 598mg, Carbohydrate 30g, Fiber 4g, Sugars 0g, Protein 6g

Posted in appetizer, side | Tagged , , , , , | Leave a comment

Watermelon Greek Salad

greek_watermelon

Sweet and savory salad. photo: Abigail Weber

I had the distinct pleasure to visit a good friend’s bountiful garden last week. While there was so much to admire, I found his green Cherokee tomatoes the most gorgeous sight to behold. And their beauty was just the tip of the iceberg. They were crisp skinned, sweet flavored, and fantastically juicy. I’m a new fan.

For a little while now, I’ve been wanting to write a take on the classic Greek salad using watermelon paired with tomato. This seemed like the perfect opportunity to go forward with that idea. As you’ve no doubt noticed, I pay almost as much attention to what my finished recipe will look like as to what it will taste like. When thinking about this Greek salad, I kept tripping up on the fact that you wouldn’t be able to to see the difference between the tomato and the watermelon. They were just too same-same looking on camera. And I didn’t want to use tart green tomatoes. When these eye-catching Cherokees rolled into my life, they practically sang to me that they needed to be in this dish.

This is another great salad to bring along to any Labor Day festivities you may be attending this weekend. Just make sure you add the watermelon at the last minute. True to its name it’s chock full of water and tends to create a bit of a puddle if it sits around in the salad too long. I even go so far as to drain it in a colander before adding it to the salad. If you do this too, don’t throw that watermelon juice away. Add some seltzer and mint and you’ve got yourself a refreshing beverage as well!

Serves 6 as a side

Dressing
1/2 teaspoon dried oregano
2 teaspoons Dijon mustard
1 tablespoon white wine vinegar
1 tablespoon lemon juice
2 tablespoons olive oil

Salad
4 cups of 1-inch pieces of watermelon, set in a strainer over a bowl to drain for about 30 minutes
2 large tomatoes (I used one red heirloom and one green Cherokee), cut into chunks
2 Lebanese cucumbers, cut into chunks
1/2 small red onion, thinly sliced
1/3 cup pitted and halved kalamata olives
1 tablespoon fresh oregano leaves
1/3 cup crumbled feta cheese

  1. To make the dressing: In resealable jar, combine all the ingredients and shake well to combine.
  2. To make the salad: In a large bowl, combine the watermelon, tomato, cucumber, onion, olives, and oregano. Pour over the dressing and toss to combine. Sprinkle over the cheese and serve immediately.

Nutritional analysis based on 6 servings:
Calories 143, Fat 9g, Sodium 310mg, Carbohydrate 16g, Fiber 2g, Sugar 11g, Protein 3g

Posted in lunch, salad, side | Tagged , , , , , , | Leave a comment

Black Bean and Corn Quinoa Salad

corn_quinoa

Simple is often better. And it doesn’t get much simpler than this flavorful quinoa, corn, and black bean salad. photo: Abigail Weber

I have a tendency to search out the exotic ideas in cooking. I love trying new ingredients or creating unexpected ingredient pairings. But I also understand that the simple things in life can be the most deeply satisfying. Take this salad for instance. For most, I’d hardly call quinoa an exotic ingredient anymore. And corn and black beans are a classic coupling. Put them all together, and you have an easy, tasty side with a minimum of culinary effort.

I’m sure many of you out there will be barbecuing and picnicking with friends this upcoming Labor Day weekend. I highly recommend this dish as your contribution to the collective meal. I guarantee it will be a hit. Put simply, it’s a feel good summer dish that won’t keep you slaving in the kitchen when what you’d rather be doing is sticking your toes in the sand while the waves take you to your happy place.

Serves 8 as a side

3 cups cooked and cooled quinoa
2 cups cooked and cooled corn kernels (from about 2 ears)
1 can (15 1/2 ounces) black beans, rinsed and drained
1 medium tomato, finely chopped
1 small cucumber, finely chopped
2 scallions, thinly sliced
1/4 cup lime juice
1 teaspoon ground cumin
2 tablespoons olive oil
1/3 cup fresh cilantro leaves, sliced
1/4 cup fresh mint leaves, sliced
Salt and cracked black pepper to taste

  1. In a large bowl, combine the quinoa, corn, beans, tomato, cucumber, and scallion and stir to combine.
  2. In a small measuring jug, whisk together the lime juice, cumin, and oil.
  3. Pour the dressing over the salad and stir in the cilantro and mint. Season to taste with salt and pepper and serve.

Nutritional analysis based on 8 servings (does not include salt and pepper to taste):
Calories 205, Fat 6g, Sodium 169mg, Carbohydrate 34g, Fiber 6g, Sugar 1g, Protein 7g

Posted in lunch, side | Tagged , , , , | Leave a comment

Tomatillo Baked Eggs

egg_tomatillo

Make this dish when you are having friends over for brunch. photo: Abigail Weber

Another solution to my great breakfast dilemma arrived this week from the CSA in the form of tomatillos. I love these little green beauties. They are tart and tangy and when you cook them down they develop a light creamy consistency. They also happen to pair really nicely with eggs. This is not the type of dish you’d whip up on a Monday morning before work but I think it’s nice to have some special brunch dishes in your back pocket. Whether you choose to break this out when guests are coming round or feel that a quiet Sunday morning with the family is reason enough, this casserole is a real crowd pleaser. Just a quick read over the ingredients will get your taste buds tingling. Eggs, chorizo, cheese, cumin, jalapeno, and of course tomatillos. Yes, please.

Serves 6

8 ounces fresh chorizo, thinly sliced into rounds
2 teaspoons vegetable oil
1 medium onion, thinly sliced
1 jalapeno, seeded and thinly sliced
3 garlic cloves, thinly sliced
1 teaspoon ground coriander
1/2 teaspoon ground cumin
1 pound tomatillos, coarsely chopped
1/4 cup queso fresco
1/3 cup fresh cilantro leaves
6 extra large eggs
More fresh cilantro and warm corn tortillas, for serving

  1. Preheat the oven to 375°F.
  2. Heat a wide, shallow, ovenproof pan over medium-high heat. Add the chorizo and cook 3 to 4 minutes, until browned all over. With a slotted spoon, remove from the pan and set aside. (If you are using dried chorizo, you can skip this step and simply cook the dried chorizo with the onion and jalapeno in the next step.)
  3. Reduce the heat to medium-low and add the oil. Add the onion and jalapeno and cook, stirring, about 5 minutes, until the onion has softened. Add the garlic, coriander, and cumin and return the chorizo to the pan. Cook, stirring, for 1 minute.
  4. Add the tomatillos along with 1/3 cup water. Increase the heat to medium and bring to a simmer. Cook about 10 minutes, stirring occasionally, until the tomatillos have just about broken down. Remove from the heat. (If you like, the recipe can be completed up to this step and refrigerated until you are ready to cook the eggs and serve. Make sure to bring the tomatillo mixture back to room temperature before adding the eggs.)
  5. Stir the queso fresco and cilantro into the tomatillo mixture. You can choose to bake directly in the pan in which you cooked the tomatillo mixture or pour the mixture into a medium baking dish.
  6. Carefully crack the eggs over the top of the tomatillo mixture. Bake, uncovered, for 12 to 15 minutes, until the whites are just set but the yolks are still runny. The eggs will continue to cook when they are removed from the oven. (If you are cooking the eggs on a tomatillo mixture that was made earlier and brought to room temperature, they may need to cook 2 or 3 minutes longer to fully set the whites.*) Serve sprinkled with more cilantro and with warm corn tortillas alongside.

Nutritional analysis based on 6 servings,
does not include extra cilantro and tortillas for serving:
Calories 319, Fat 24g, Sodium 604mg, Carbohydrate 8g, Fiber 2g, Sugar 5g, Protein 18g

* Because I am completely obsessive about my recipe writing, I feel I need an even more extensive note about the cooking time of the eggs. After testing this recipe twice (once with a hot tomatillo mixture and once with a room temperature tomatillo mixture), I did a little research into other baked eggs recipes. Turns out, the cooking time for the eggs is all over the place. Some recipes called for 5 to7 minutes. Some called for 8 to 10. And others called for as long as 18 to 20. The upshot is, egg cooking time can vary greatly. You’ll have to use your judgment when cooking them. Everything from the temperature of the tomatillo mixture to the vessel you cook them in will affect their cooking time. (For instance, if you crack the eggs right into the hot skillet you cooked the tomatillo mixture in rather than transferring to a baking dish, you’re going to have a quicker cooking time.) Keep an eye on the eggs and look for the whites to just turn opaque. And remember, the eggs will continue cooking after you pull them from the oven.

Posted in breakfast, brunch, lunch, main, Uncategorized | Tagged , , , , | 2 Comments

Blistered Cherry Tomato and Avocado Smash Toasts

smashed_avo

A healthy, hearty breakfast. photo: Abigail Weber

I have to admit that I struggle with breakfast. I don’t have much of a sweet tooth at the best of times and in the morning I’m particularly uninterested in a high sugar meal. So a savory energy boost like these pide toasts is right up my alley on the early side of the day.

I tend to buy pints of cherry tomatoes in pairs. One pint for my kids to consume right out of the carton and another pint to roast up and use in all sorts of yummy ways. When I’ve got roasted cherry tomatoes on hand, this is a delicious way to utilize them. Their sweet-tart flavor is the perfect complement to smoky paprika-flavored smashed avocado.

I like to serve my tomato and avocado on Turkish pide toast, which my local supermarket just happens to carry. However, if you find it a little hard to come by, feel free to use this combo on your preferred toast type. It’s a satisfying way to start the day that should get you through to lunchtime with out your stomach rumbling for more.

Makes 6 toasts

1 pint cherry tomatoes
3 teaspoons olive oil
Salt and cracked black pepper to taste
1 large avocado, pitted and flesh scooped out
Juice of 1 lime
1/2 teaspoon smoky paprika
1 large Turkish pide, cut into six 3 by 5-inch rectangles and toasted

  1. Preheat the oven to 400°F.
  2. Place the tomatoes in a small rimmed baking tray and toss with the oil to coat. Season to taste with salt and pepper. Bake, uncovered, for about 15 minutes, until the tomatoes are soft and beginning to break down and crack open.
  3. Meanwhile, in a medium bowl, using a fork, smash the avocado flesh with the lime juice and paprika. The lime juice should be fully incorporated into the avocado but there should still be some chunky bits of avocado in the mix. Season to taste with salt and pepper.
  4. Toast the pide pieces until lightly browned. Top each piece with about 2 tablespoons of smashed avocado and about 6 cherry tomatoes.* Using the back of a spoon, lightly press down on each tomato to release their juices onto the avocado and serve.

*The cherry tomatoes can be placed on these toasts right out of the oven or cold from the fridge.

Nutritional analysis per toast, does not include salt and pepper to taste:
Calories 236, Fat 10g, Sodium 267mg, Carbohydrate 32g, Fiber 4g, Sugars 1g, Protein 5g

Posted in appetizer, breakfast, lunch, side, snack, Uncategorized | Tagged , , , , , | 1 Comment

Southwestern Chicken and Vegetable Soup

southwest_soup

The more condiments the better with this Southwestern soup. photo: Abigail Weber

This Southwestern style chicken soup features the great base of Latino cooking: sofrito. While there are many, many variations of sofrito throughout Spain, Portugal, and Latin America, my version consists of onion, bell pepper, jalapeno, and garlic. All the flavor of this comforting soup bubbles up from that heavenly combination. Sofrito is a great cooking basic to be aware of because so many dishes are built upon it. I find that once you get a handle on the basic flavor combinations of a regional cuisine, you can cook just about anything from that area of the world.

You may be thinking, soup in the summer? What gives? Here’s the thing. If you know anyone with Latin roots, you’ll know that soup is an all year round meal. It doesn’t matter what the thermometer says, a hot home-cooked meal is on the menu at least once a day. I grew up with my father (who hails from the Dominican Republic) enjoying soup at every lunchtime repast. To this day he insists on a good cup of soup to accompany his midday meal. And I believe he’s onto something there. Warm soup, spicy foods, they all help you sweat it out on a hot day, consequently cooling the body down.

But apart from the practicalities of hot dishes in the summer, soup is just so feel-good satisfying. When you are out of ideas for what to do with a bountiful harvest, it’s always a good option. In this dish alone I was able to put to use my squash, green bell pepper, corn, and jalapeno. And the condiments I chose reflect the bits and pieces I had in my fridge and pantry at the time. Use your imagination to dress up this soup and you’ll find you’ve created a real fridge cleaner that also happens to deliver mucho sabor.

bonita_squash

Bonita squash

2 tablespoons vegetable oil
1 small onion, finely chopped
1 medium green bell pepper, finely chopped
1/2 jalapeno, seeds removed if you like, finely chopped (for the mildest soup, skip the jalapeno altogether as the chipotle chile adds some heat as well)
2 garlic cloves, finely chopped
2 teaspoons ground cumin
1 teaspoon ground coriander
1/2 teaspoon chipotle chile
1 1/2 quarts good quality chicken stock
3/4 pound chicken breast (2 to 3 chicken breasts)
1 medium bonita squash, coarsely chopped (2 1/2 to 3 cups chopped) (or substitute zucchini or any other summer squash)
2 cups corn kernels (from about 2 ears)
2 tablespoons finely chopped fresh cilantro
1 can (15 1/2 ounces) black beans, rinsed and drained
1/4 cup lime juice
Salt to taste
Queso fresco, avocado, cilantro, hot sauce, and tortilla chips, to serve

  1. In a large soup pot, heat the oil over medium-low heat. Add the onion, pepper, and jalapeno and cook, stirring for 8 to 10 minutes without coloring, until soft. Add the garlic, cumin, coriander, and chipotle and cook, stirring for 1 minute, until fragrant.
  2. Pour in the stock with 2 cups water, increase the heat to medium-high and bring to a boil. Add the chicken, lower the heat to a simmer, cover, and cook 8 to 10 minutes, until the chicken is cooked through but still tender.
  3. Remove the chicken from the soup, place on a cutting board and, when cool enough to handle, shred the chicken with two forks or your hands.
  4. Meanwhile, add the squash, corn, cilantro, and beans and cook, uncovered, about 5 minutes, until the squash is tender.
  5. Return the shredded chicken to the pot with the lime juice and remove from the heat. Season to taste with salt and serve the soup with all the Southwest fixings you like.

Nutritional analysis based on 8 servings, does not include serving suggestions:
Calories 240, Fat 7g, Sodium 452mg, Carbohydrate 27g, Fiber 4g, Sugar 4g, Protein 19g

Posted in lunch, main, soup | Tagged , , , , , , , , | 3 Comments