CSA Season is Open!

The day has arrived! My Community Supported Agriculture group is open for the season. Because of the cold, wet spring the pick up wasn’t enormous but what we did get was lovely. I know everyone from the group is eagerly awaiting some purslane recipe ideas. Check back soon. Ideas are brewing…

Posted in Uncategorized | Leave a comment

Grilled Arctic Char with Baby Fennel and Tomato Slaw

arcticchar

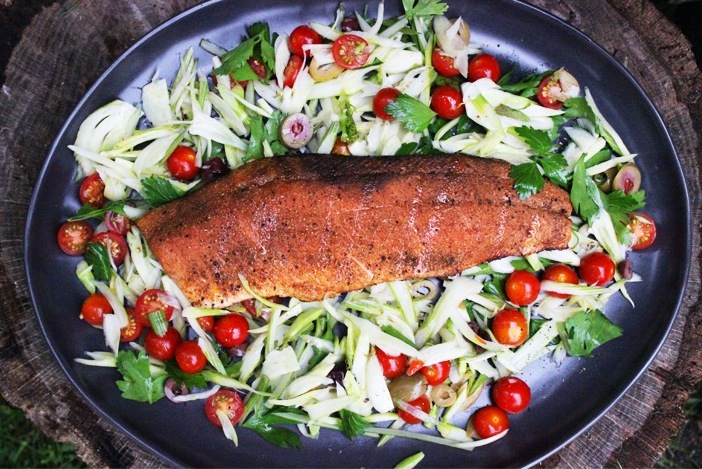
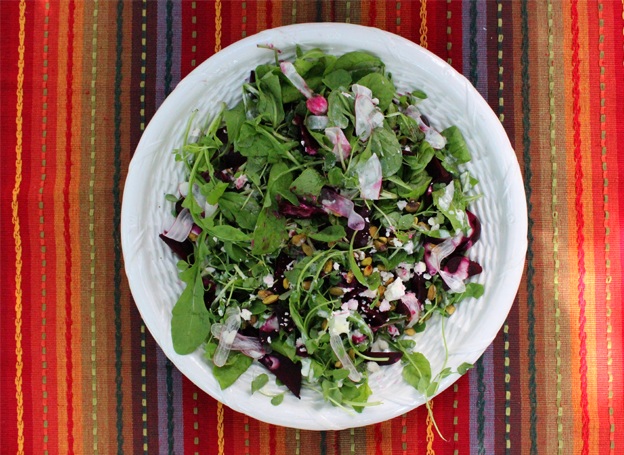
Cedar plank grilled arctic char on a bed of fennel and tomato slaw. photo: Abigail Weber

fennel_salad

Fennel and tomato slaw on the side. photo: Abigail Weber


It has been a long, cold winter in the Northeast United States. Here we are a week into June and my sweaters still aren’t fully packed away. My backyard thermometer registered 58 degrees this morning. Brrr! As if to drive home this point, my farmers’ markets are still awash with apples, potatoes, and fennel, typically late autumn to early spring fare. The way I see it, there’s a silver lining to everything. And this pretty spring salad featuring the aforementioned fennel has certainly helped me find one here. I’ve quick pickled baby fennel with rice wine vinegar and sugar. I only needed about 20 minutes sitting time for it to achieve the lightly pickled state I was looking for. I wanted it to retain a nice crunch. This salad also features olives purchased from local vendor Pickle Licious. The olives are brined with jalapenos so they add nice heat and complexity to the dish. Fennel pairs up perfectly with an oily fish, the obvious choice being salmon. But my heart belongs to arctic char, a fish that marries the best qualities of trout and salmon. If the cool, rainy weather is still holding out, you may want to cook your fish under the broiler. But if there’s a break in the nasty weather, take your fish outside and grill it on a cedar plank. You’ll almost have yourself believing that summer is just around the corner.

Serves 4

3/4 cup rice wine vinegar
2 tablespoons granulated sugar
2 teaspoons kosher salt
6 baby fennel bulbs (about 2 bunches), trimmed, halved and thinly sliced on an angle
1 pint cherry tomatoes, large tomatoes halved, small tomatoes left whole
1/3 cup sliced mixed olives
2 teaspoons light brown sugar
1 1/2 teaspoons ground cumin
1 1/2 teaspoons ground coriander
1 teaspoon celery salt
Cracked black pepper to taste
2 filets arctic char (about 1 1/2 pounds), skin on
1/2 cup loosely packed flatleaf parsley leaves

2 cedar grilling planks, soaked and lightly oiled*

  1. In a medium saucepan over medium-low heat, combine the vinegar, granulated sugar, and salt. Heat, stirring and without bringing to the boil, until the sugar and salt have dissolved.
  2. Place the fennel in a medium bowl and pour over the vinegar mixture. Let sit at room temperature for at least 20 minutes, stirring occasionally to make sure all the fennel is coated. Drain the liquid and discard. Add the tomatoes and olives and stir to combine.
  3. Meanwhile, in a small bowl, combine the brown sugar, cumin, coriander, celery salt and pepper to taste. Stir to combine well. Sprinkle each arctic char filet with the spice mixture.
  4. Preheat a grill to medium-high heat.
  5. When the grill is hot, place the arctic char, skin-side down, on the soaked and greased cedar planks and place the planks on the grill. Cook, covered, until just cooked through, about 8 to 12 minutes. My family likes their fish very, very rare so I usually cook it no more than about 10 minutes. Remove from the heat and carefully lift the filets off the cedar planks. The skin may or may not stick to the plank. If it does, that’s fine just lift the meat away from the skin.
  6. Serve with the fennel and tomato slaw.

Nutritional analysis based on 4 servings:
Calories: 433, Fat 18g, Sodium 709mg, Carbohydrate 21g, Fiber 7g, Sugar 5g, Protein 41g

* A note about cedar planks: Check the directions on the cedar plank packaging. Depending on the brand, they will need to be soaked for 20 minutes or up to 1 hour. There are also some brands that come pre-soaked. After soaking, I wipe the plank down with a paper towel to dry it then wipe it with an oil-soaked paper towel to grease it. I cooked the arctic char over direct heat for 4 minutes then moved the plank to indirect heat for the remainder of the cooking time.

Posted in main, salad | Tagged , , , , , , | 2 Comments

Rhubarb and Ginger Crumble

rhubarb

This rhubarb crumble is best served warm, with a cooling scoop of ice cream over top. photo: Abigail Weber

Poor rhubarb. It seems eternally destined to share a co-starring role with strawberries. But not so this week! I’ve skipped the strawberries and given this tart little lady its very own star turn. This is my take on the classic summer crumble. I erred on the safe side and cooked my rhubarb with a full cup and a half of granulated sugar. However, if you’re watching your sugar intake or if you just like things a little less sweet, I’d say you can go as low as one cup of sugar. That’s what I used the second time I made this and my husband actually preferred it. Note, he was the only one. The rest of my tasters voted hands-down for the sweeter version. I think the best word to describe this decadent treat is fragrant. While it’s cooking, your house will fill with the smells of cinnamon, ginger, and brown sugar. And that’s fresh ginger, mind you, lending this comfort food a touch of the exotic that elevates it just that little bit.

Serves 8

6 cups of 1-inch pieces of rhubarb (from about 2 pounds)
1 tablespoon grated fresh ginger
1 teaspoon ground cinnamon
1 1/2 cups granulated sugar
2 teaspoons lemon juice
1 cup all-purpose flour
1/2 cup firmly packed light brown sugar
1/2 cup rolled oats (not instant)
1 teaspoon salt
1 stick (8 tablespoons) cold unsalted butter, cut into cubes
Ice cream, for serving

  1. Preheat the oven to 350°F.
  2. In a medium bowl, combine the rhubarb, ginger, cinnamon, granulated sugar, and lemon juice. Mix well to combine and coat the rhubarb.
  3. In a separate medium bowl, combine the flour, brown sugar, oats, and salt. Mix to combine. Using your finger tips, rub the butter into the dry ingredients until the mixture resembles coarse meal and the butter is fully incorporated with the dry ingredients. Be sure to use only your fingertips so the heat from your hands does not melt the butter.
  4. Tip the rhubarb mixture into an 8 by 8-inch pyrex dish. Top the rhubarb with the crumble mixture so that the rhubarb is completely covered. Bake 1 hour, until bubbling and browned on top. Let the crumble sit for at least 15 minutes before serving. Serve warm or at room temperature topped with the ice cream of your choice.
Posted in dessert | Tagged , , | Leave a comment

Herbed Ricotta Toasts with French Breakfast Radishes

ricotta_radish

An elegant lunch. photo: Abigail Weber

I’m always searching for new and interesting lunch options and this recipe is a product of one of those searches. I tend to have lots of odds and ends left in my fridge after a week of recipe testing. One afternoon, while searching for lunch fixings, my fridge offered up a half empty carton of ricotta, some loose radishes, and a bounty of fresh herbs at which I’d been picking all week. They came together into a very satisfying lunch for one. With a few tweaks here and there, this elegant lunch recipe was born. If you’re serving this as lunch, I’d serve two slices of toast with a side salad. If adapted for a sit down summer appetizer, one slice of toast per person is plenty.

Serves 4 as a lunch or 8 as an appetizer

1 loaf 9-grain or other hearty bread, ends trimmed, sliced into 8 thick slices
Olive oil cooking spray
Flaked sea salt and cracked black pepper to taste
2 cups fresh ricotta
1/3 cup finely chopped fresh dill
1/4 cup finely chopped fresh flatleaf parsley
3 tablespoons finely chopped fresh mint
Finely grated rind of 1 lemon
8 large French Breakfast radishes (about 1 bunch), thinly sliced
Truffle, lemon, or extra virgin olive oil for drizzling

  1. Preheat the oven to 425°F.
  2. Place the bread slices on a large rimmed baking sheet. Grease each slice on both sides with cooking spray. Sprinkle with sea salt. Bake until lightly browned, about 10 minutes.
  3. In a large bowl, mix the ricotta with the dill, parsley, mint, and lemon rind. Season well with salt and pepper.
  4. Top each slice of bread with a 1/4 cup of the ricotta mixture, top with a few radish slices and drizzle with oil. Finish with cracked black pepper and serve.

Nutritional analysis based on 4 servings:
Calories 403, Fat 21g, Sodium 327mg, Carbohydrate 37g, Fiber 5g, Sugars 3g, Protein 19g

Posted in appetizer, lunch | Tagged , , , , , | 1 Comment

Lacinato Kale and Farro Salad

kale_pecorino

Lacinato kale is delicate enough to serve raw. photo: Abigail Weber

The deep dark leafy green that we generally refer to as lacinato kale is much-prized in the Tuscan countryside. In Italy, they call it cavolo nero and they enjoy it in fresh salads like this one, in hearty soups paired with beans and sausage, or simply sauteed with olive oil and garlic. The green markets were overflowing with lacinato kale this past weekend so I grabbed some up and pulled together this quick little side. We enjoyed ours with a lovely steak on the barbecue and our first Jersey tomato salad of the season. My kids were skeptical at first but after their first bite of this zinging salad they came around. My husband loved it so much he piled it onto thick toast slices the next morning at breakfast. A success all around.

Serves 4 as a side

1/2 cup farro, rinsed *see note
1 large or 2 small bunches lacinato kale
1/2 cup grated pecorino cheese, plus more for serving
1 small garlic clove, finely grated
1 teaspoon finely grated lemon rind
1/4 cup lemon juice
3 tablespoons extra virgin olive oil

  1. Cook the farro according to the package instructions, drain well, and let cool to room temperature.
  2. Meanwhile, remove the tough inner stem of the kale. Working with a handful of leaves at a time, stack the leaves, roll them up like a cigar, shred them into ribbons, and place them into a medium bowl. Add the cheese to the bowl and stir to combine.
  3. In a small measuring jug, combine the garlic, lemon rind, lemon juice, and oil and whisk until combined. Add the cooled farro to the kale and pour over the lemon dressing. Stir to coat evenly. Let the salad sit for at least 30 minutes before serving. Serve with extra pecorino if you like.

Nutritional analysis based on 4 servings:
Calories 208, Fat 14g, Sodium 46mg, Carbohydrate 18g, Fiber 3g, Sugars 0g, Protein 6g

*A note on farro: Farro is an ancient grain that originated in Egypt but is most closely associated with Italian cooking. Dried farro can be found in quality supermarkets in the aisle featuring rice, barley, and cous cous. The type of farro most commonly sold in the United States is farro medio, made from a grain called emmer. This nutty tasting grain is best cooked al dente and can be eaten in soups, salads, or on its own as a side dish.

Posted in salad | Tagged , , | 2 Comments

Scrambled Eggs with Ramps and Smoked Salmon

eggs_ramps

Serve this meal for breakfast, lunch, or dinner! photo: Abigail Weber

Ah, eggs. I can eat them for breakfast, lunch, snack, or dinner. Is there any end to the ways they can be prepared? I wasn’t always so crazy for eggs but a few years back I signed on for farm fresh milk and egg delivery. I really hope I never have to go back to supermarket eggs. My husband has been away on business so I whipped up this quick dinner for myself last night. Ideally, the scramble would be done with heavy cream but for midweek dinner, I decided to take it down a notch. If you’re feeling like a bit of a splurge, though, go ahead and sub out the milk for cream. It’s a revelation.

Serves 1

1/2 tablespoon unsalted butter
2 teaspoons olive oil
4 or 5 ramps, sliced (green leaves separated from roots and stems)
2 extra large eggs (that’s the only size my farm delivery has)
1/4 cup milk
Salt and cracked black pepper to taste
A few pieces smoked salmon

  1. In a medium frying pan (preferably cast iron) heat the butter and oil over medium-low heat. Add the ramp roots and stems and cook until just tender, about 4 or 5 minutes.
  2. Meanwhile, in a medium bowl, use a fork to beat together the eggs and milk. Season to taste with salt and pepper.
  3. Increase the heat to high and add the egg mixture to the pan with the ramps. Let sit until the base of the eggs is just beginning to set. Then, using a heatproof spatula, push the egg toward the center of the pan and tip the pan to let the wet, uncooked egg on top flow to the base. Continue pushing and tipping all the way around the pan to create big curds of scrambled egg. Remove from the heat before all the egg is cooked through. The eggs will continue to cook on the plate.
  4. Top the egg with some smoked salmon and just try to make it to the table before you’ve devoured the whole beautiful plate!

Nutritional analysis based on one serving:
Calories 372, Fat 28g, Sodium 791mg, Carbohydrate 8g, Fiber 2g, Sugars 5g, Protein 22g


Posted in breakfast, main | Tagged , , , | Leave a comment

Nancy’s Homemade Chicken Stock

Pour stock into ice cube trays and freeze. Then pop out just what you need. photo: Abigail Weber

This stock recipe is based on the stock I learned to make at Rockpool, a restaurant I worked at in Sydney. Instead of using chicken bones, we used the whole chicken: meat, skin and all. The resulting stock was hearty, full-flavored, and had a lovely texture. At Rockpool we kept it very simple and used only chicken, no aromatics 0r vegetables, then we layered flavor onto it depending upon how it was used in a recipe. At home, I like to add leek for just a hint of sweet, onion essence in the finished product. When you cook the stock, be sure you bring it up to a fairly heavy boil at first and then skim off the scum that comes to the top. After skimming, turn the heat way down to let it gently bubble away. This way your stock will turn out beautifully clear.

Makes about 6 cups (depending on evaporation)

21/2 pound whole chicken, rinsed and cut into 4 pieces (backbone removed)
2 medium leeks, trimmed, halved lengthwise, and cleaned well
3 quarts cold water

  1. Using a sharp knife, make shallow slashes through the meat on the leg and breast of the chicken.
  2. In a large dutch oven over medium-high heat, combine the chicken pieces, leek, and water. Bring to a steady boil and continue boiling for about 20 minutes as you skim the scum that rises to the top.
  3. Reduce the heat to medium-low to simmer very lightly. Continue simmering, watching that it stays at a very light simmer, for another 2 hours, skimming the surface when needed.
  4. Line a fine strainer with cheesecloth and strain the stock into a bowl. Let cool then package up to refrigerate for 3 to 4 days or keep in the freezer for around 3 months.
Posted in Uncategorized | Tagged , , , , | 2 Comments

Spring Risotto, featuring Ramps!

ramps

Look for ramps at the farmers’ markets for a few weeks between late April and early June. photo: Nancy Duran

Ramps are really special. If you see them at your market, I highly recommend you snap them up. They’ll be gone in a minute. Seriously, their season is so short, about 3 weeks in total usually. And they can be hard to find if you live outside of the South Carolina to Canada Eastern corridor. But most of all, their flavor is something to behold. They are a perfect blend of sweet, garlicky, and oniony. I think a risotto is a perfect place to showcase their flavor. Here I pair them up with another star of the spring vegetable season: delicate asparagus spears. If you can’t get your hands on ramps, this recipe should not go to waste. Leek or scallion can stand in for ramps when they are not in season.

ramp_risotto

A risotto inspired by the spring harvest. photo: Abigail Weber


Serves 4

1 tablespoon butter
1 tablespoon olive oil
1 bunch ramps (about 8), chopped (green leaves separated from roots and stems)
1 cup arborio rice
1/2 cup dry white wine
3 – 4 cups good quality chicken stock, warmed
1/2 bunch asparagus, woody ends trimmed, roasted or grilled then cut into 1-inch pieces
1/2 cup grated Gruyere cheese
Salt and cracked pepper to taste
1/4 cup chopped fresh flatleaf parsley

  1. In a medium saucepan, melt the butter with the oil over medium-low heat. Add the ramps and cook until tender, 4 to 5 minutes.
  2. Add the rice and cook, stirring, about 1 minute to coat the rice all over with the ramps and butter.
  3. Increase the heat to medium, add the wine and cook, stirring, until absorbed, about 2 minutes.
  4. Add 3/4 cup of the warm stock and simmer, stirring, until the liquid is absorbed. Continue adding the stock in 1/2 cupfuls, stirring at a low simmer and letting the liquid absorb before adding the next cupful. Cook until the risotto is al dente and still quite soupy (it thickens up on the plate so when it is on the heat, you want to make sure the mixture is still quite loose and liquid), 15 to 20 minutes in total.
  5. Stir in the asparagus and cheese, season with salt and pepper and remove from the heat. Finish the risotto with the parsley and serve immediately with a green salad.

Nutritional analysis based on 4 servings:
Calories 355, Fat 14g, Sodium 172 mg, Carbohydrate 54g, Fiber 4g, Sugars 6g, Protein 15g

Posted in main | Tagged , , | Leave a comment

Beet Relish Summertime Topping

beet relish

This beet relish is my summer staple. photo: Abigail Weber

I’m pleased to announce that baby beets have made their debut at the farmers’ markets. I love the small baby beets of late spring. I find them sweeter and a little less “in your face earthy” than their autumn cousins. Living in Australia for six years, where beetroot is practically the national vegetable, I developed a deep appreciation for this mighty veggie. Now, I’ll toss it on top of practically everything, from burgers to sausages to a fried egg sandwich in the morning. This beet relish is the perfect topping to have on hand throughout the barbecue season. Cook up a great big batch of this relish (the recipe can be doubled) and follow this link for an easy guide to sterilizing jars and it will keep for up to six months in the fridge.

Makes 4 cups

2 pounds cleaned and trimmed beets
2 tablespoons olive oil
1 medium onion, finely chopped
1 large green apple, peeled and finely chopped
2 garlic cloves, finely chopped
1 tablespoon garam masala
Salt and cracked black pepper to taste
1 cup sugar
2/3 cup apple cider vinegar
juice of 2 oranges, zest of 1 orange

  1. Preheat the oven to 400°F. Wrap each individual beet in foil and place on a rimmed baking sheet.
  2. Roast the beets until tender. For large beets, roast about 1 hour. For medium beets, roast about 45 to 50 minutes. And for small beets, roast 30 to 40 minutes. Peel back foil to allow beets to cool. When cool enough to handle, peel and coarsely grate.
  3. Place a large, deep saucepan over medium-low heat and add oil. When hot, add onion and apple and cook, stirring, until onion is soft, about 10 minutes.
  4. Add the garlic, garam masala, and beets to the onion mixture. Cook, stirring, for about a minute.
  5. Add the sugar, vinegar, orange juice and zest. Bring to a low simmer and cook until thickened, about 20 minutes. Fill sterilized jars while relish is still warm.


Nutritional analysis based on a 1/4 cup serving size:
Calories 101, Fat 2g, Sodium 35mg, Carbohydrate 21g, Fiber 2g, Sugars 18g, Protein 1g

Posted in condiment | Tagged , , , , | 2 Comments

Mediterranean Beet Salad


beet salad

I used pea shoots and arugula in my salad but any salad greens will do the trick. photo: Abigail Weber

Can you tell how much I like beets yet? Here’s another great, simple beet recipe that is a terrific side to bring to a barbecue or picnic. And because I picked up some lovely French Breakfast radishes this weekend, I decided to throw them into the mix as well. I sliced them very thinly on my mandoline. They lend a crispy texture to the salad that marries well with the tender beets.

Serves 6

Salad
6-8 baby beets, trimmed and cleaned
4 firmly packed cups salad greens (such as arugula and pea shoots)
1 tablespoon lemon juice
Sea salt and cracked black pepper to taste
4 French Breakfast radishes, thinly sliced
1/3 cup shelled pistachios, toasted
1/3 cup crumbled feta cheese
1/4 cup fresh mint leaves

Dressing
2 tablespoons lemon juice
2 tablespoons Greek yogurt
2 tablespoons olive oil

  1. To prepare the salad: Preheat the oven to 400°F. Wrap each individual beet in foil and place on a rimmed baking sheet.
  2. Roast the beets until tender, 30 to 40 minutes. Peel back foil to allow beets to cool. When cool enough to handle, peel and slice.
  3. Toss the salad greens with the lemon juice and season with salt and pepper. Assemble the salad laying a bed of greens on a serving platter and nestling the beet among the greens. Sprinkle over the radishes, pistachios, feta, and mint leaves.
  4. To make the dressing: Combine all the ingredients in a medium bowl. Whisk well to combine. Drizzle with half the dressing, reserving the remainder for passing.

Nutritional analysis based on 6 servings:
Calories 144, Fat 10g, Sodium 165 mg, Carbohydrate 12g, Fiber 3g, Sugars 7g, Protein 5g

Posted in salad | Tagged , , , , | 2 Comments